Add a business
A business in Paysense represents a single legal employing entity - typically one ABN. Every employee, pay run, super contribution and STP submission lives under a business, so this is the very first thing you'll create in a new tenant.
This tutorial walks through the five-step Create new business wizard end-to-end. Along the way you'll see how Paysense uses live integrations with the Australian Business Register (ABR), Google Places, the bank registry, and the APRA super fund register to do most of the data entry for you.
What you'll need
| Item | Required | Notes |
|---|---|---|
| Business name or ABN | Yes | Used to look up the official record from the ABR |
| Registered business address | Yes | Looked up via address autocomplete or entered manually |
| Primary contact | Yes | A name, email, and AU mobile number |
| Bank account | Optional | Can be added later from the business dashboard |
| Default super fund | Optional | Can be added later; useful when adding employees |
You can skip the optional bank account and default super fund steps for now. If you do, the wizard will still create the business - just expect to come back to Business → Details → Bank Account and Business → Super before your first pay run.
Step 1: Open the wizard and look up the business
Sign in to Paysense. From the left-hand sidebar, expand Business and click New. You'll land on the Create new business wizard at /business/new - the wizard has five steps shown across the top, and your progress is preserved within the session.
The fastest way to populate Step 1 of the wizard is to use the ABR autocomplete. Start typing the trading or registered name of the business in the Search the Australian Business Register field. In this example we'll create a business for Canva, so type Canva and wait a moment - Paysense queries the ABR live and returns matching entities.
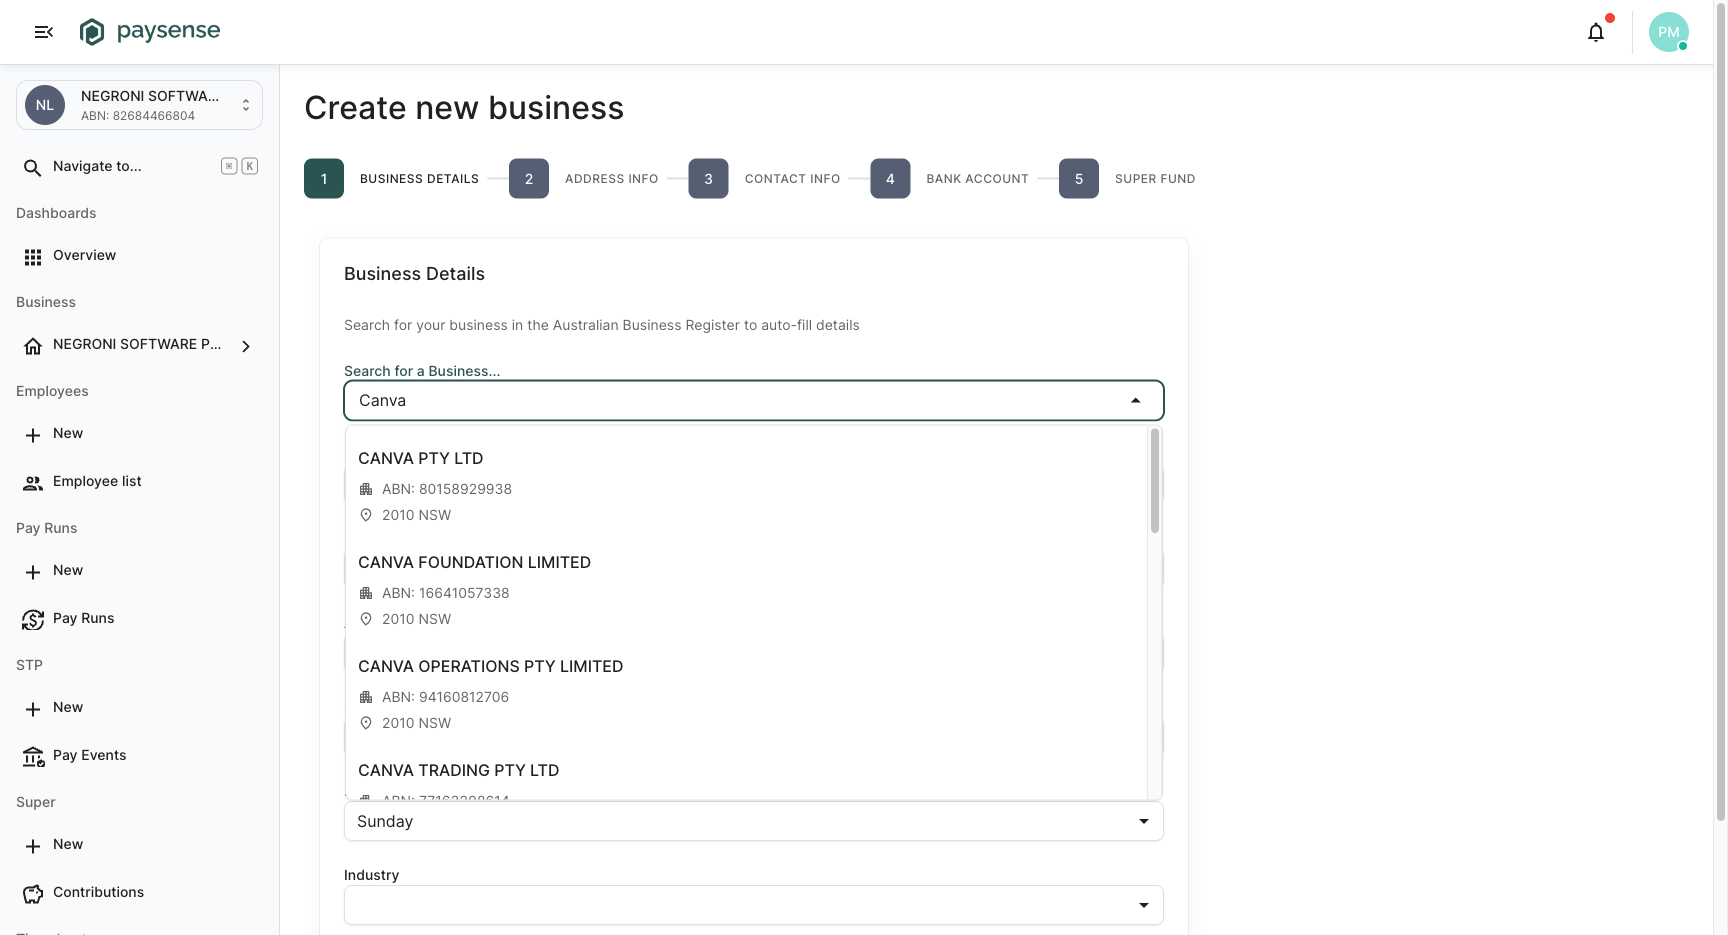
Select the correct entry - CANVA PTY LTD - and Paysense will automatically fill in the Business Name (trading name), Legal Name, and ABN (validated against the ABR).
You only need to confirm the two payroll-specific defaults yourself:
| Field | Description | Default |
|---|---|---|
| Standard Hours per Day | Used to convert salaried employees' annual rates into hourly rates and to validate timesheet entries | 7.6 |
| End of Week | The day a pay-week ends. Drives weekly pay-cycle boundaries | Sunday |
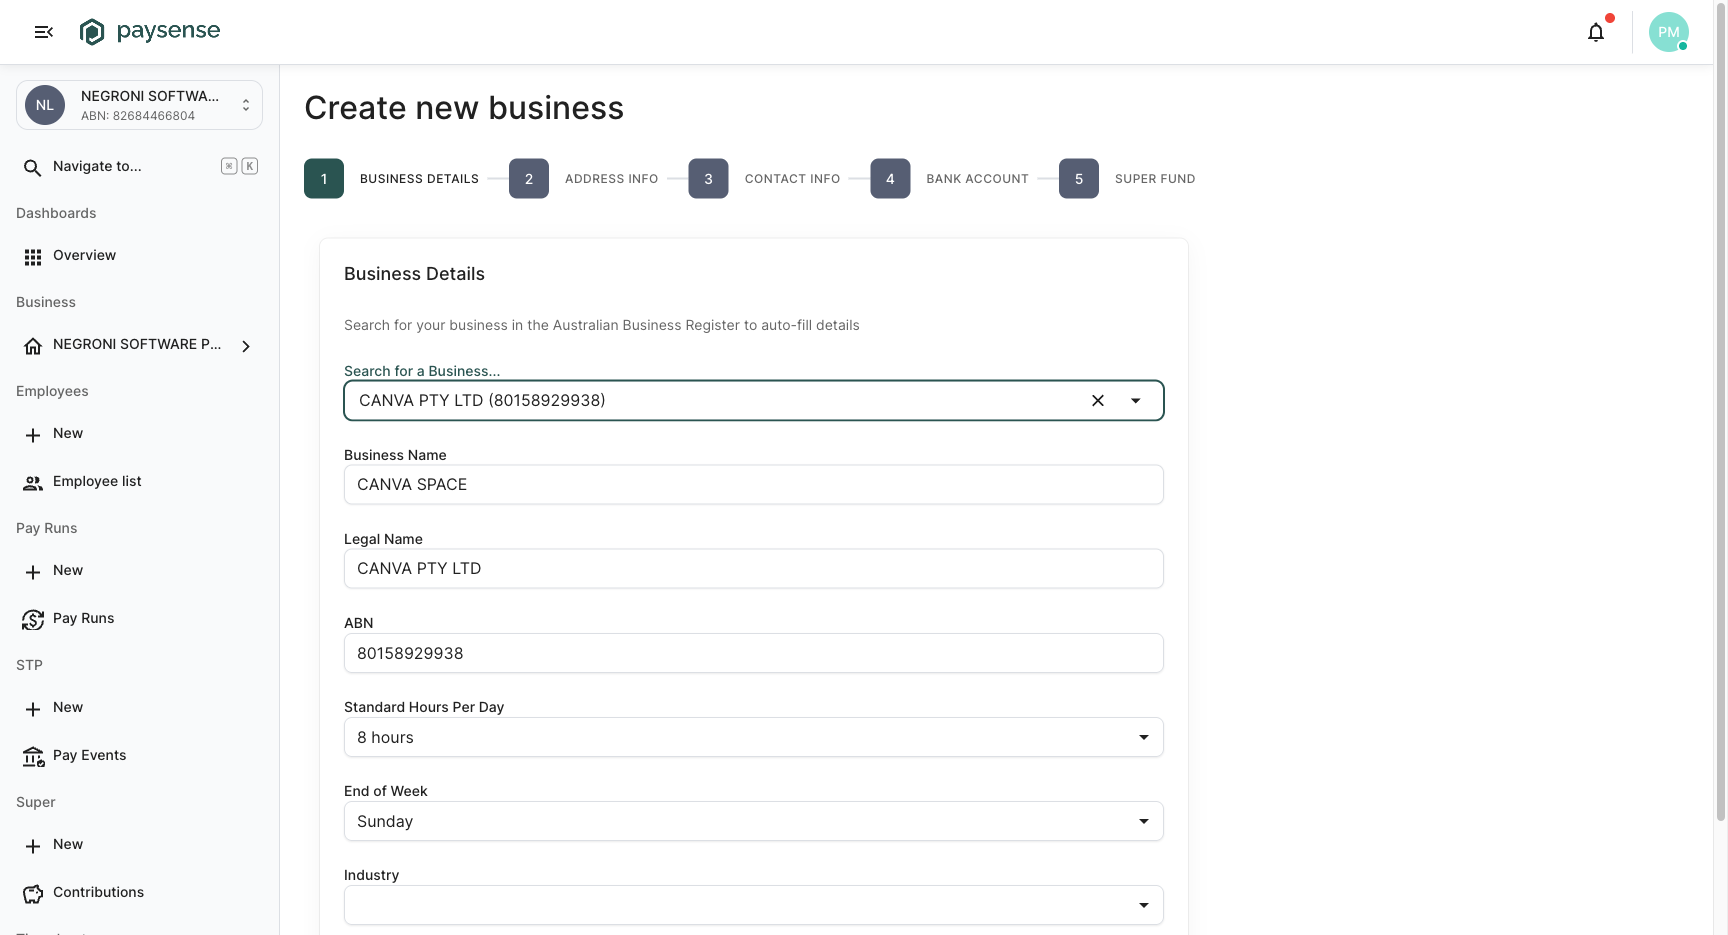
If the business isn't found in the ABR (for example a brand-new entity), you can type the Business Name, Legal Name, and ABN manually. The ABN will still be validated against the standard ABN check digit.
When the form is complete, click Next.
Step 2: Add the registered address
Step 2 of the wizard captures the business's registered address, which Paysense uses for STP filings and as the default workplace address for employees.
Just like Step 1, the fastest path is the Address Lookup field, which is wired up to Google Places. Start typing the street address and select from the dropdown. For our Canva example we'll use Canva's Surry Hills HQ - type 110 Kippax Street Surry Hills and the lookup returns matching addresses worldwide.
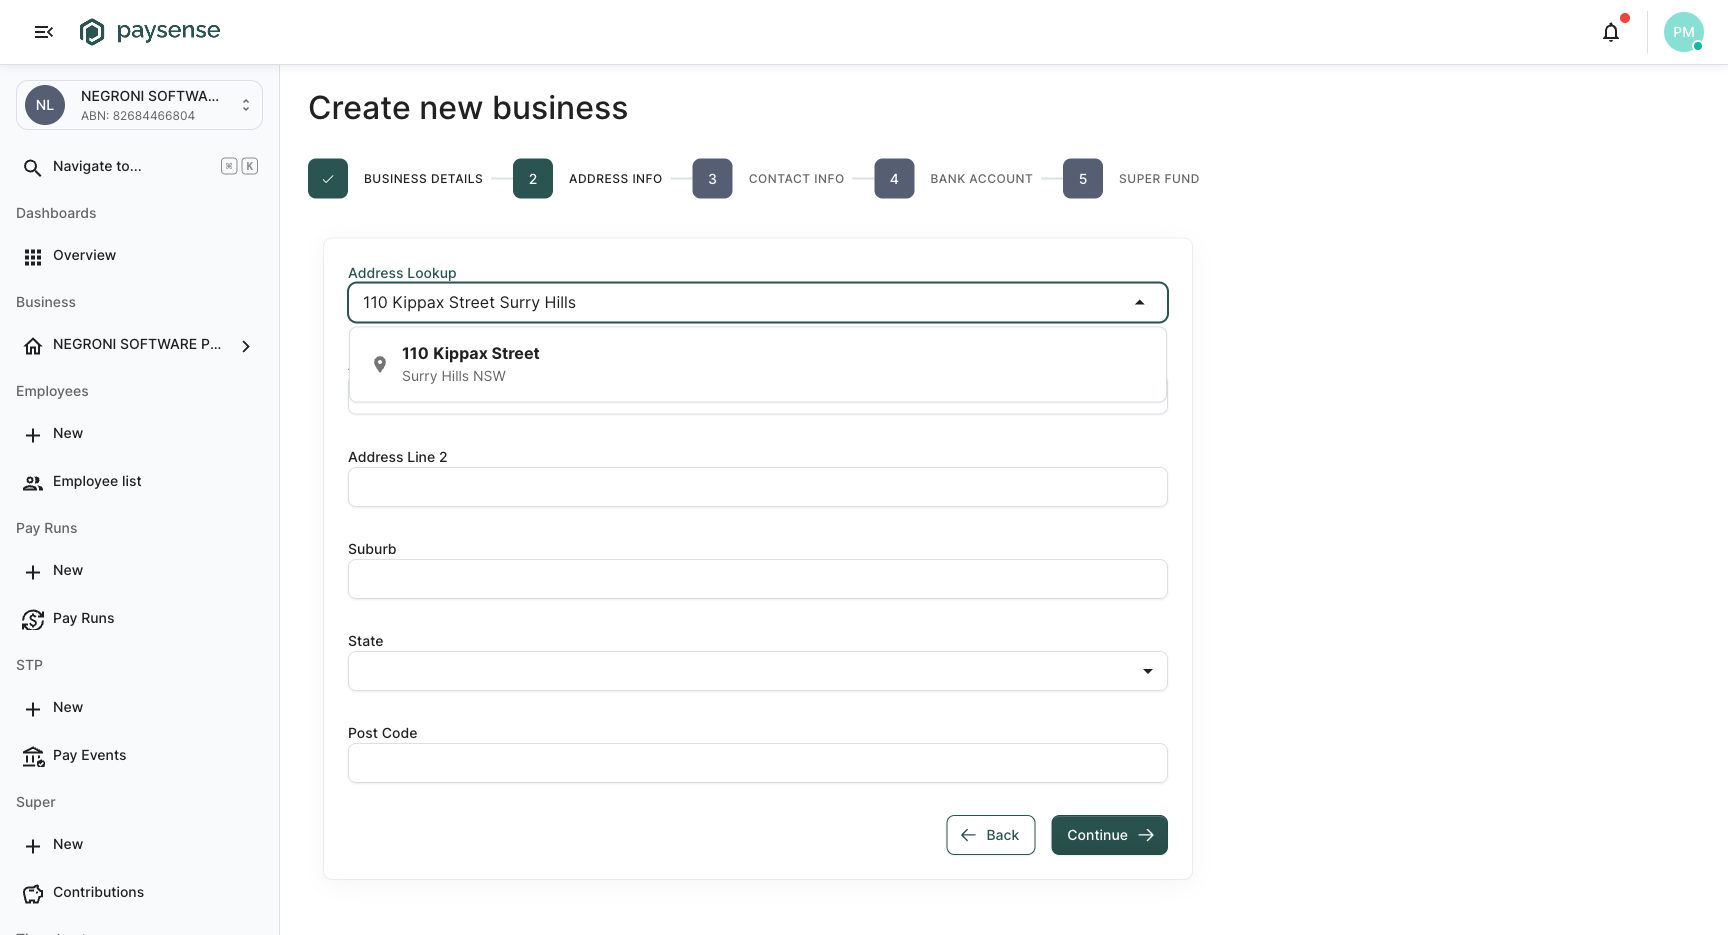
Pick the correct result and Paysense parses the components into the individual fields - Address Line 1, Suburb, State, and Post Code.
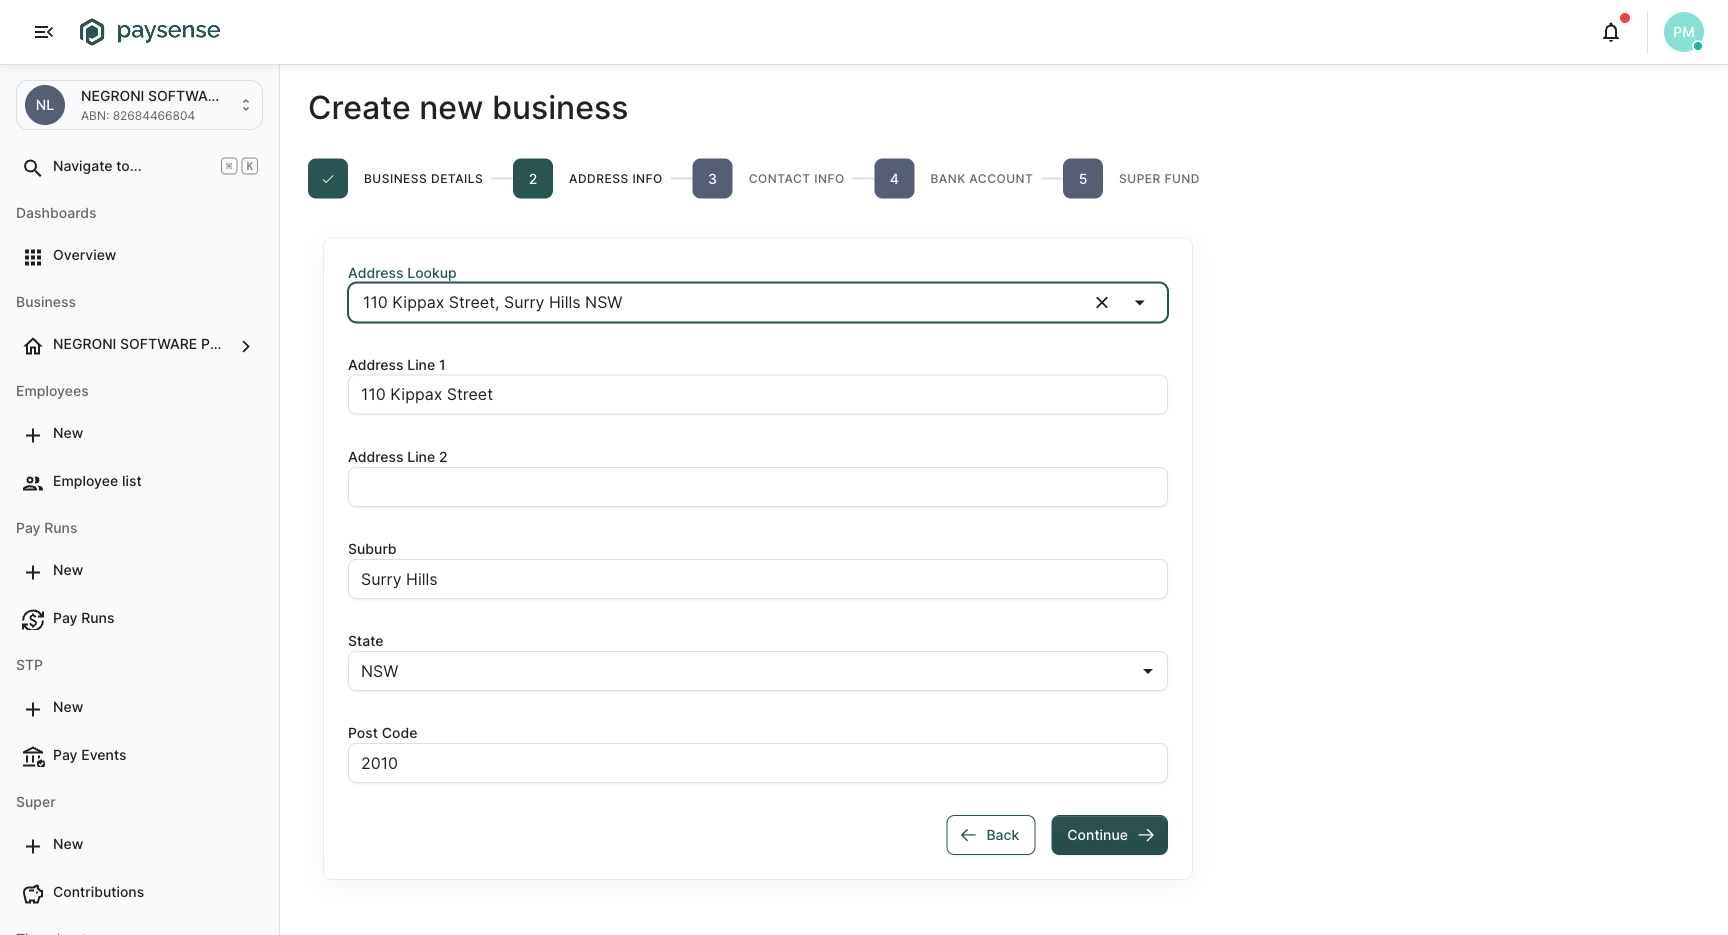
Address Line 2 is optional - use it for unit, level, or suite numbers when the address lookup doesn't capture them. You can also bypass the lookup completely and type each field manually if you prefer.
Click Next when the address looks right.
Step 3: Add a primary contact
Step 3 of the wizard captures the primary contact for the business. This is the person Paysense will contact about the business's payroll, and the email and mobile here can later be verified to enable notifications.
Fill in the Contact Name, Email Address, and Mobile Number for the contact.
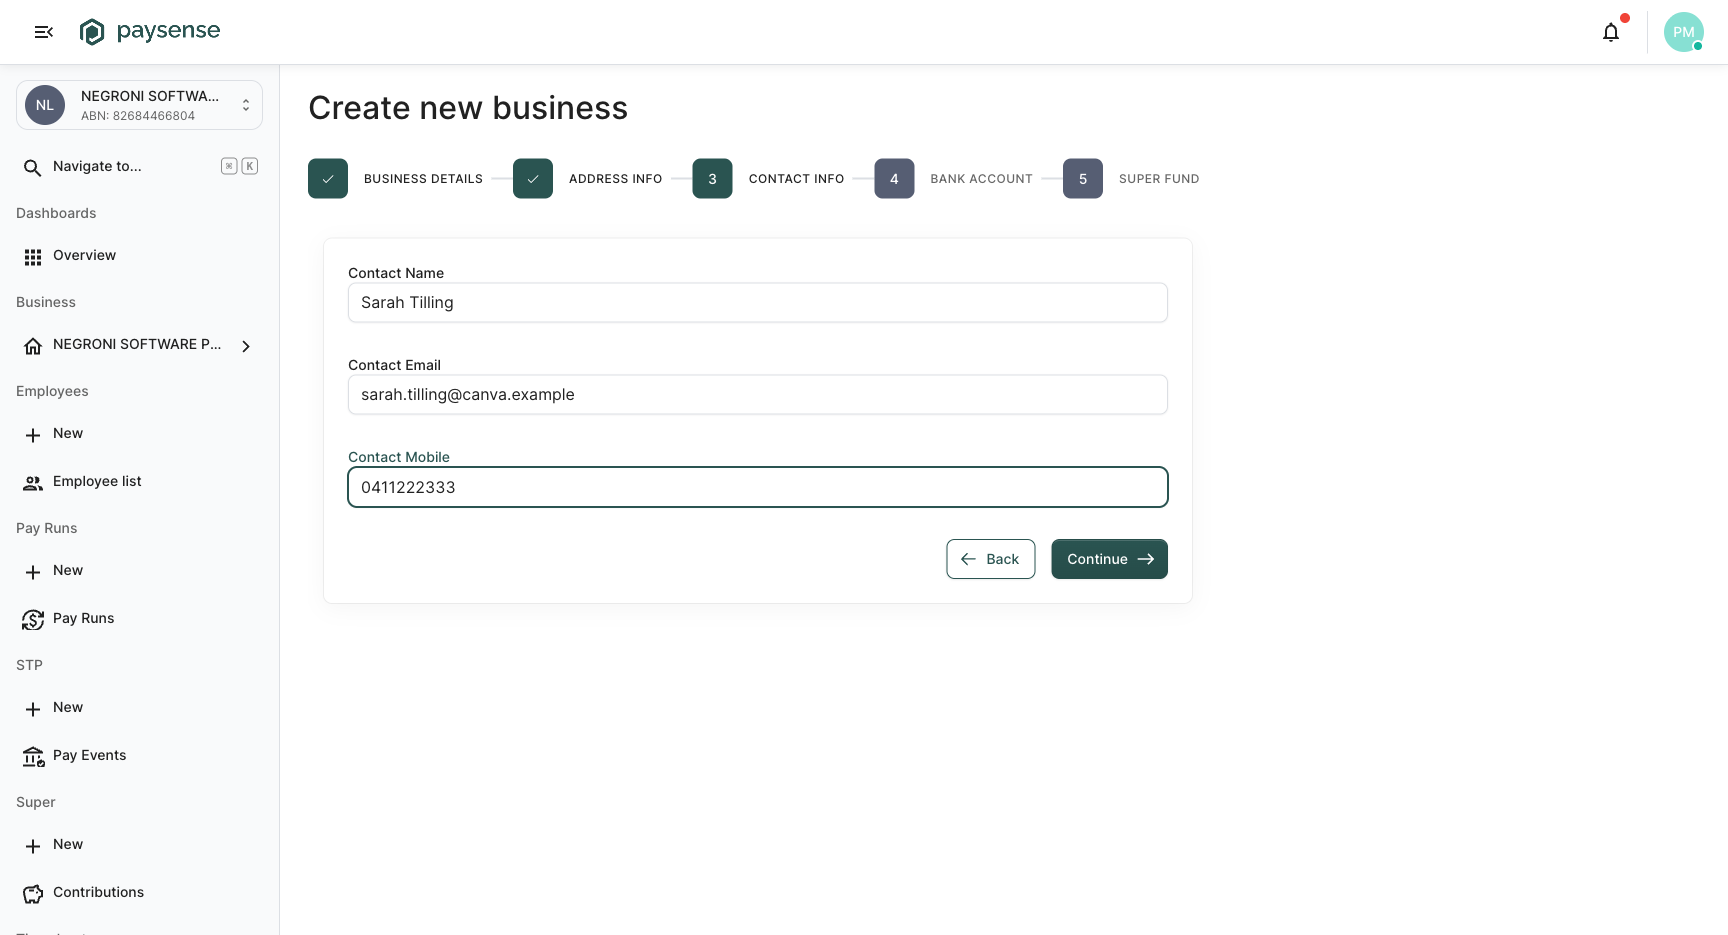
Mobile numbers are validated as Australian mobiles (04xx xxx xxx). Landlines, international numbers, and toll-free numbers are not accepted in this field.
Click Next.
Step 4: Add a bank account (optional)
Step 4 of the wizard lets you add the business bank account that will be debited when you pay employees. This step is optional - you can skip straight to the next step and add a bank account later from Business → Details → Bank Account - but adding it now means your first pay run will be ready to go.
Fill in the Account Name (typically the business name or "Operating Account"), BSB (6 digits), and Account Number (6–9 digits). As you type the BSB, Paysense validates it live against the bank registry and shows the bank and branch when it recognises the number.
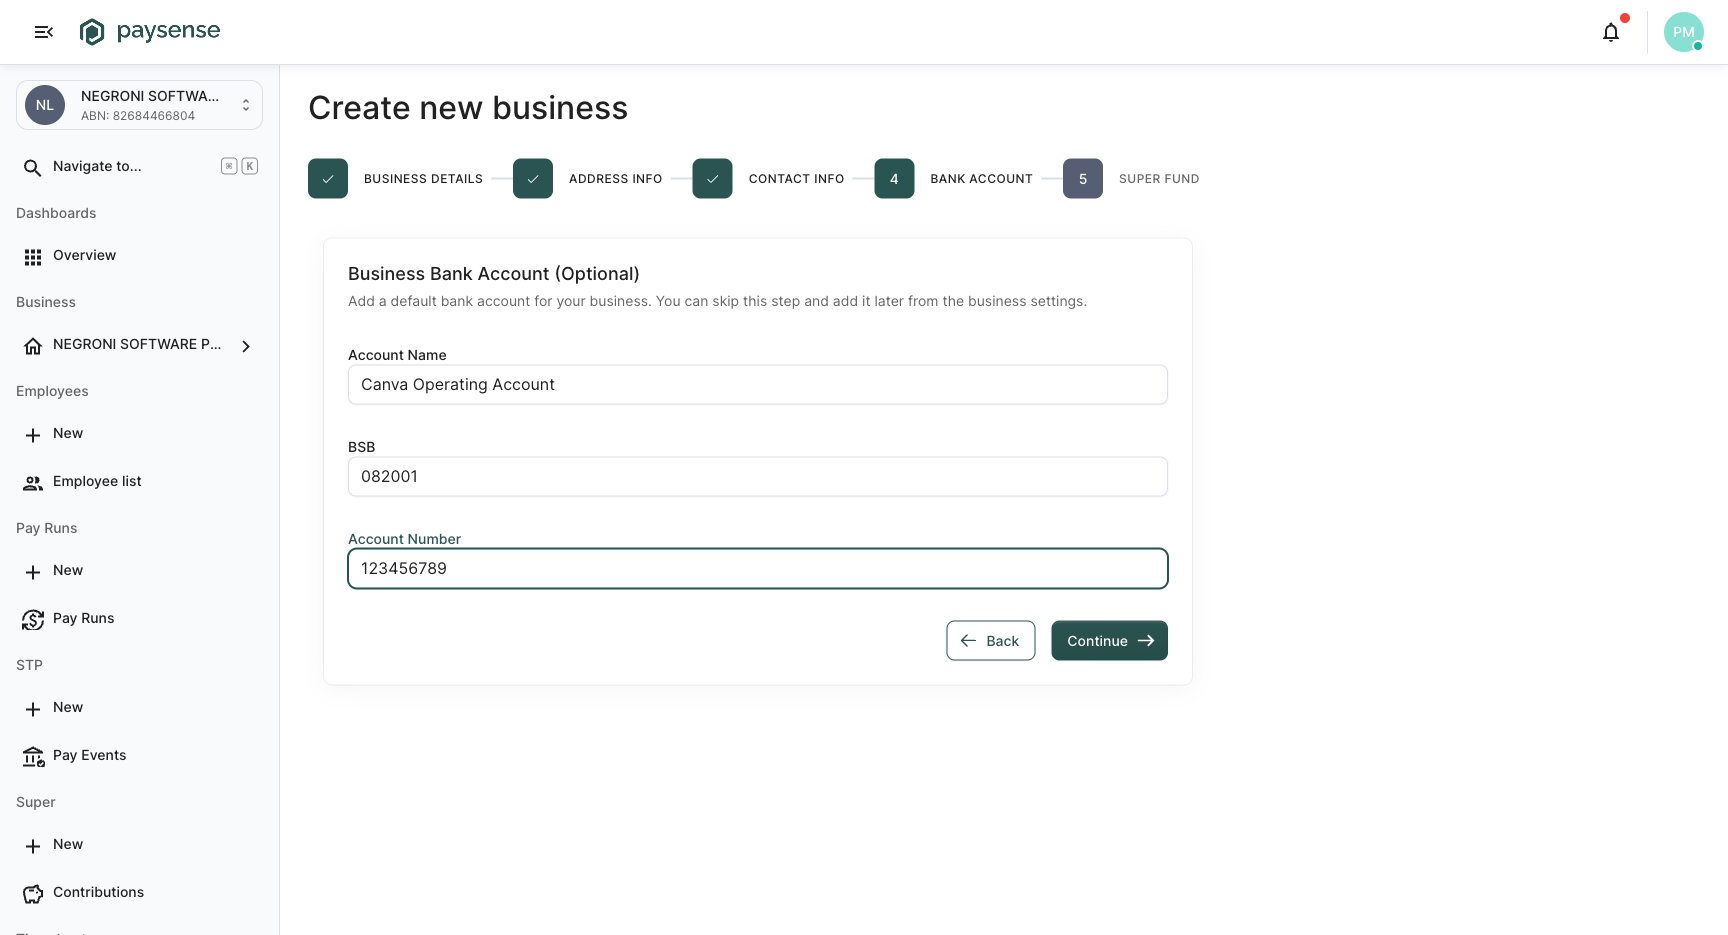
Make sure the account name and number match the records held by your bank. Mismatched details are the most common cause of ABA/EFT file rejections when you process your first pay run.
Click Next to continue.
Step 5: Set a default super fund (optional)
Step 5 of the wizard lets you nominate a default super fund for the business. When you later add new employees, this fund will be pre-selected - you can always override it per employee.
Start typing a fund name, USI, or ABN in the search box. Paysense queries the APRA register and returns matching funds with their key identifiers.
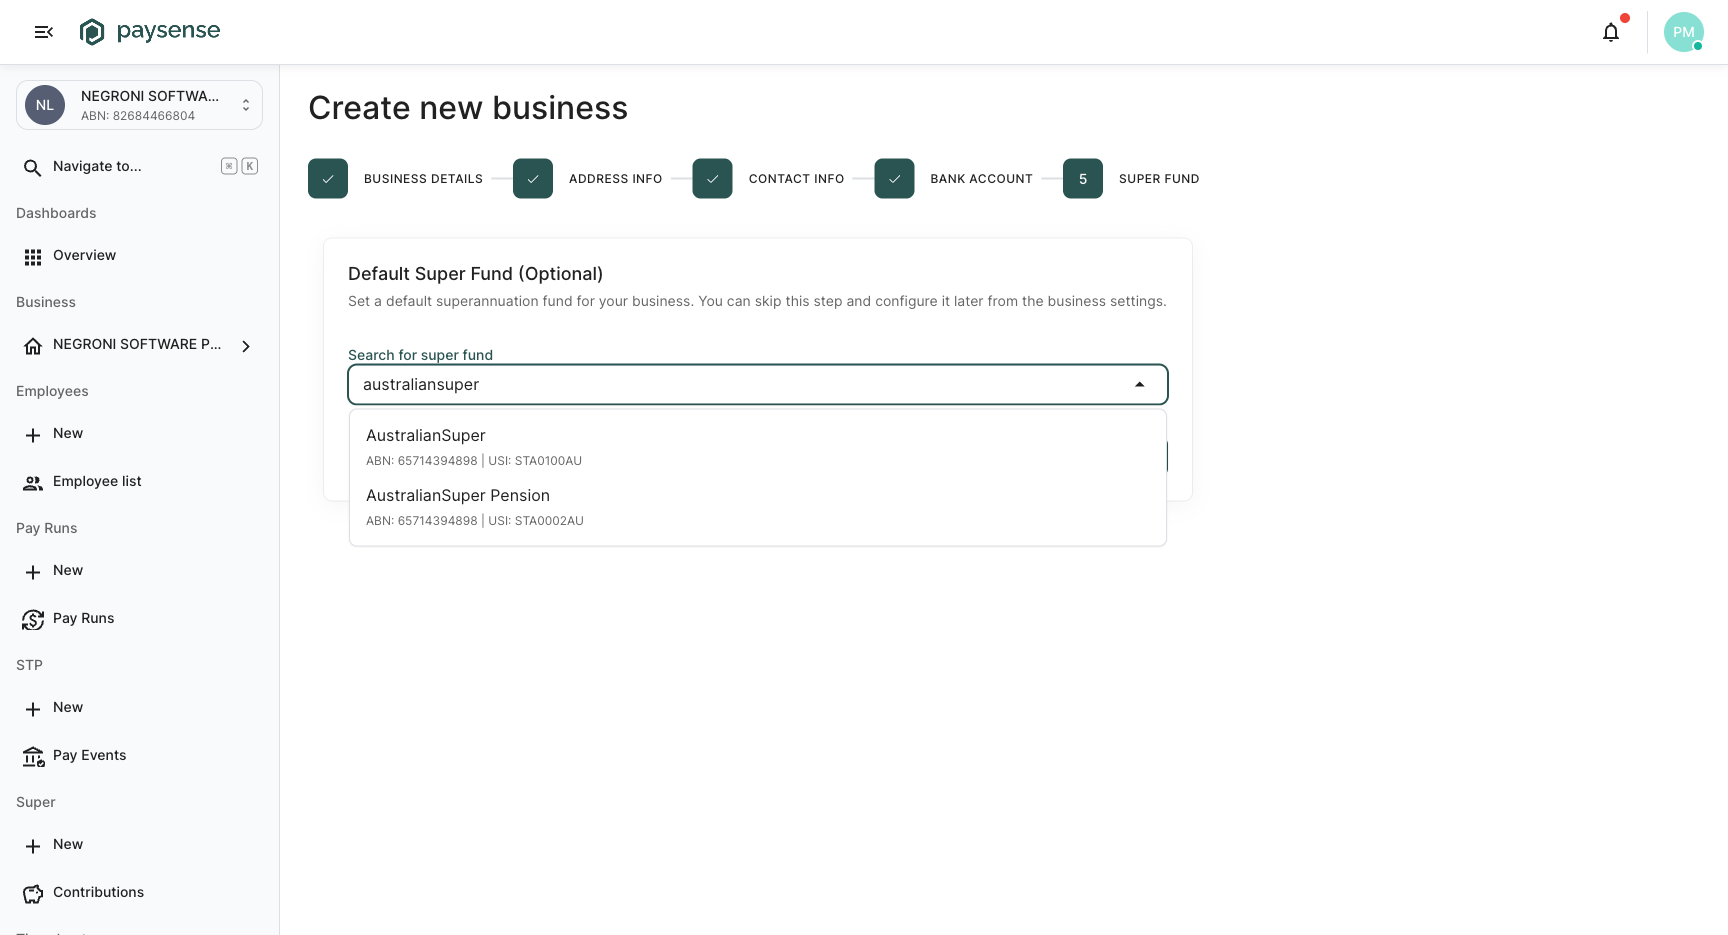
Select the fund. A summary card appears confirming the Fund Name, ABN, and USI that will be saved against the business.
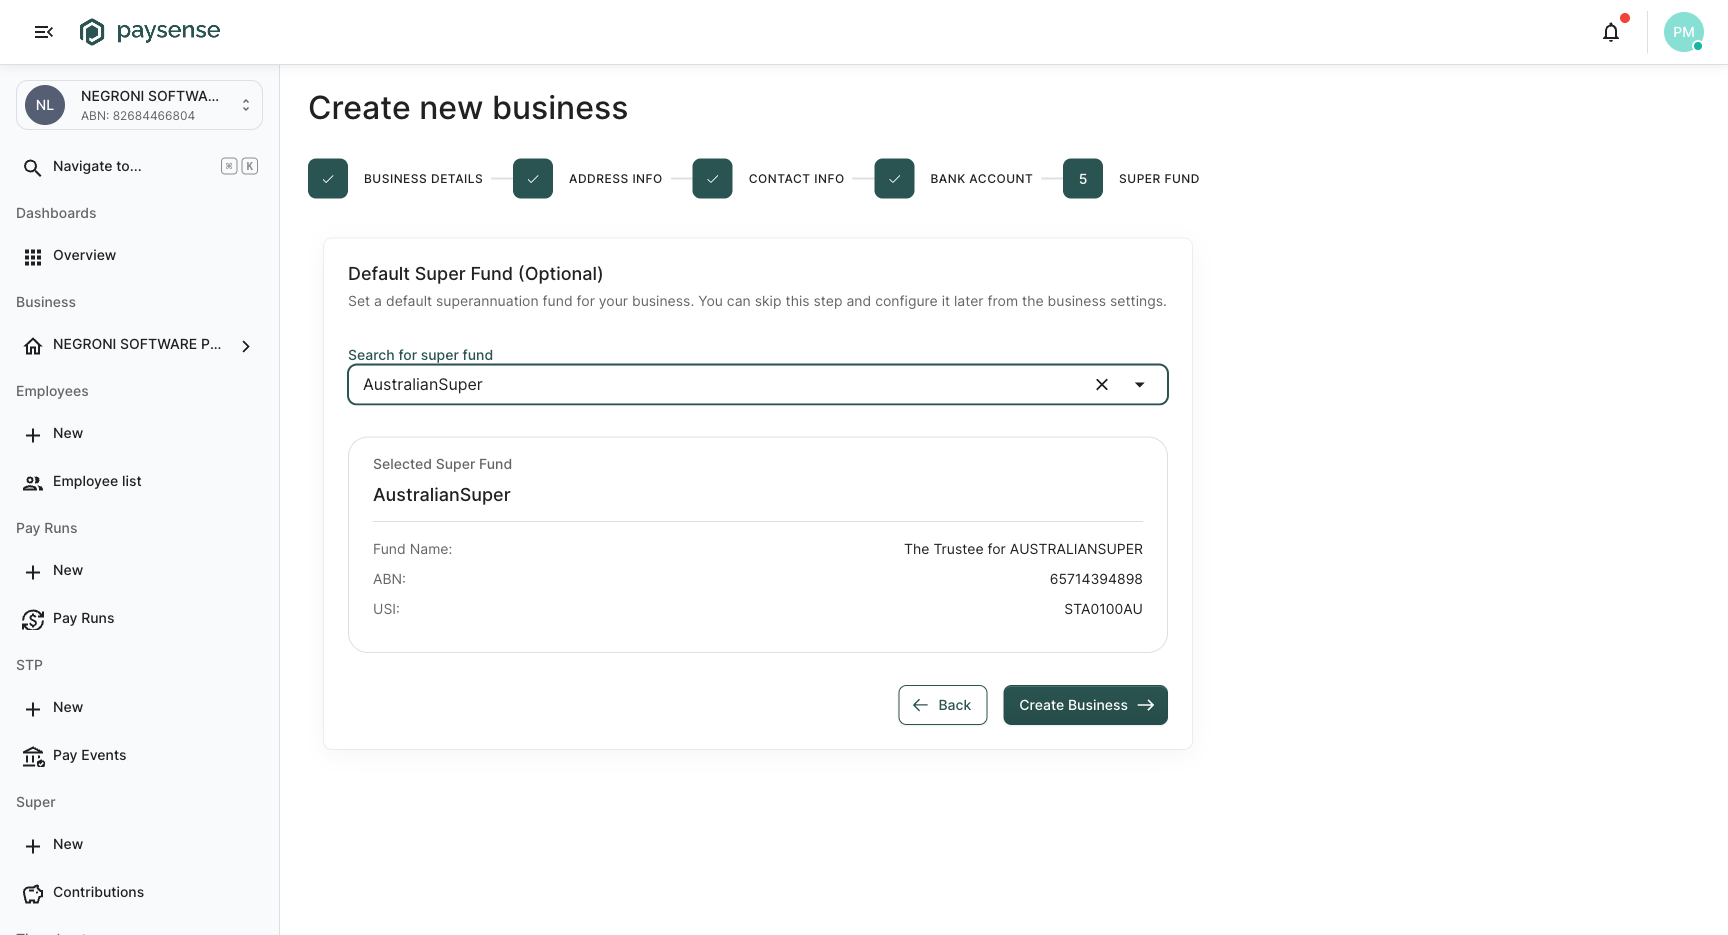
The default super fund satisfies the Stapled Super Fund / Choice of Fund requirements for any employee who doesn't nominate their own fund. Most businesses set this once and never change it.
When you're happy with the selection, click Create Business.
Step 6: Review the completion screen
Paysense saves the business and shows a confirmation screen summarising what was set up.
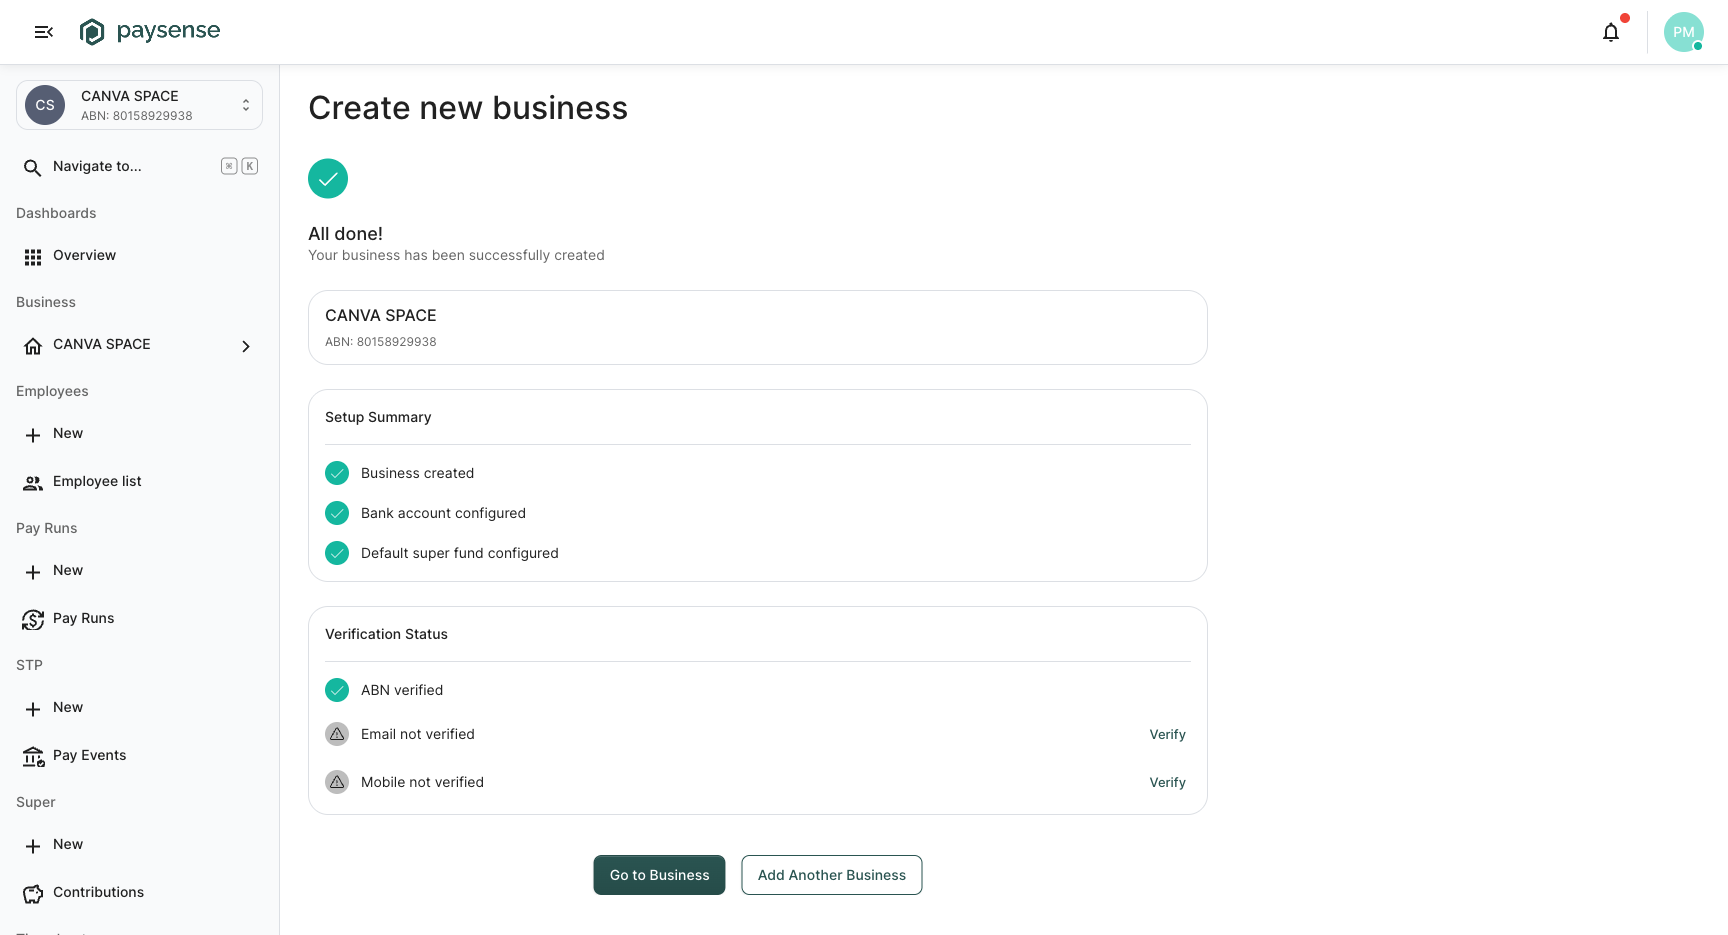
The Setup Summary confirms each piece that was successfully configured:
- Business created - the legal entity exists in Paysense
- Bank account configured - only shown if you completed Step 4
- Default super fund configured - only shown if you completed Step 5
The Verification Status panel shows three independent checks:
| Check | Meaning |
|---|---|
| ABN verified | Paysense confirmed the ABN against the ABR during Step 1 |
| Email not verified | The contact email hasn't been confirmed yet - click Verify to send a confirmation email |
| Mobile not verified | The contact mobile hasn't been confirmed yet - click Verify to send an SMS code |
You don't have to verify the email and mobile right now - they're only required for the contact to receive notifications. You can come back to these checks at any time from the business details screen.
Click Go to Business to land on the new business dashboard, or Add Another Business if you have more entities to set up.
Step 7: Land on the business dashboard
Once you click Go to Business, Paysense opens the new business dashboard at /business/{businessId}/dashboard.
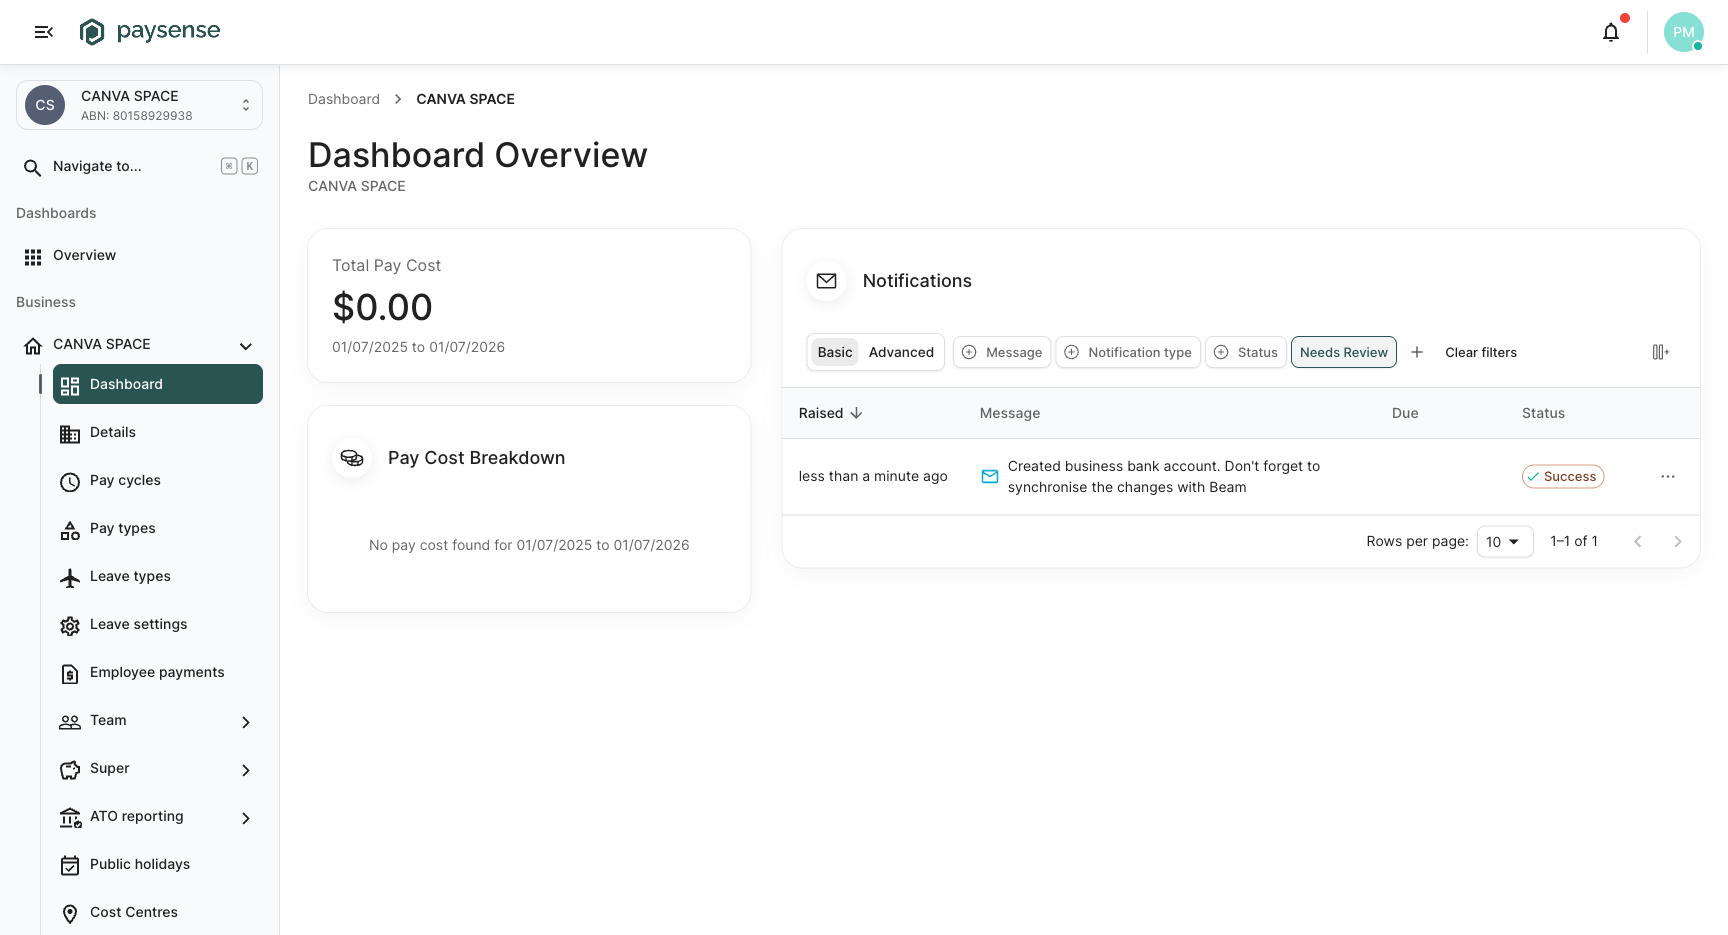
A few things to notice:
- The left sidebar now shows the new business as the active context. All the business-scoped sections - Dashboard, Details, Pay cycles, Pay types, Leave types, Leave settings, Employee payments, Team, Super, ATO reporting - are unlocked and ready to use.
- The Notifications panel on the right shows the activity log for the business. You'll see an initial entry confirming the bank account was created.
- The Total Pay Cost widget reads
$0.00for the current financial year - it'll start populating as soon as you process your first pay run.
That's it - the business is fully created and ready to use.
What's next
Now that the business exists, the typical next steps are:
- Configure pay cycles - define the weekly, fortnightly, or monthly cycles your employees will be paid on. See Configure pay cycles.
- Add your first employee - collect personal details, tax file declaration, and bank/super details. See Add an employee.
- Run your first pay run - generate payslips and create the ABA payment file. See Run your first pay run.
- Lodge your first STP event - submit a Pay Event to the ATO. See Lodge an STP event.
Troubleshooting
| Symptom | Likely cause | What to do |
|---|---|---|
| ABR autocomplete returns no results | The ABR service is rate-limiting, or the name has unusual punctuation | Try the ABN directly, or fall back to manual entry |
| Address lookup returns no results | Google Places couldn't match the address | Try a shorter query (e.g. just the street and suburb), or enter the fields manually |
| BSB field shows "Unknown bank" | The BSB isn't in the bank registry | Double-check the BSB on a recent bank statement; the field still allows you to save once you're sure it's correct |
| Super fund not found | The fund is self-managed (SMSF) or not in the APRA register | SMSFs aren't set as a default fund - leave this blank and configure SMSFs per-employee instead |
| Create Business button is disabled | A required field on a previous step is invalid | Use the stepper at the top of the wizard to jump back; invalid fields are highlighted in red |
If you hit a problem the table doesn't cover, check the Notifications panel on the business dashboard - Paysense logs detailed events there for every business-level action.