Add an employee
Adding an employee in Paysense is a five-step wizard that collects everything payroll needs to pay the person legally and correctly: who they are, how they're employed, what their tax position is, where their wages should land, and which super fund their guarantee contributions go to.
Each step saves to the server as soon as you click Continue, so the wizard is safe to leave half-finished - when you come back, you'll resume on the step you left off.
This tutorial walks through the wizard end-to-end by adding a fictional casual hire, James Anderson, to the CANVA PTY LTD test business. By the end you'll have a fully-onboarded employee attached to the Casuals - Fortnightly pay cycle you created in the Configure pay cycles tutorial.
What you'll need
| Item | Required | Notes |
|---|---|---|
| A business in Paysense | Yes | Created via the Add a business tutorial |
| At least one pay cycle | Yes | The three default cycles seeded with your business will do. See Configure pay cycles if you need a custom one. |
| The employee's personal details | Yes | Legal name, date of birth, contact details, residential address |
| The employee's TFN declaration | Yes | Tax file number and residency status. In dev mode you can generate a test TFN. |
| Bank account details for wages | Yes | BSB, account number, and account name |
| A super fund (USI or self-managed ABN) | Yes | Paysense looks funds up against the live ASIC registry |
You don't have to gather everything before starting - each step is saved independently, so you can pause after Personal Details if you're still chasing a TFN or super fund USI, then come back later to finish.
Step 1: Open the wizard and fill in personal details
From the left-hand sidebar of your business, click Employees to land on the employees list at /business/{businessId}/employees. Click Add Employee in the top-right and Paysense navigates you to the first step of the wizard at /business/{businessId}/employees/add/personal-details.
The wizard always opens on Step 1: Personal Details. Across the top you'll see all five steps as a progress indicator, with the current step highlighted. Personal Details captures everything Paysense needs to identify the employee on payslips, super contributions, and STP filings.
| Field | Required | Notes |
|---|---|---|
| Title | No | Mr / Mrs / Ms / etc. - purely cosmetic on payslips |
| First name | Yes | Legal first name as it appears on the TFN declaration |
| Middle name | No | Optional |
| Last name | Yes | Legal surname |
| Yes | Used for self-service portal invites and payslip delivery | |
| Phone | No | Mobile preferred - payroll uses it to chase missing details |
| Gender | Yes | Male / Female / Other - required for STP reporting |
| Date of birth | Yes | Used to compute age-based super eligibility |
| Start date | Yes | The first day the employee is on the payroll |
| Address line 1, Suburb, State, Postcode | Yes | Residential address. State is a dropdown of the eight Australian states and territories. |
Fill in the fields for the employee. For our example we're onboarding James Anderson, a casual hire starting in mid-April 2026.
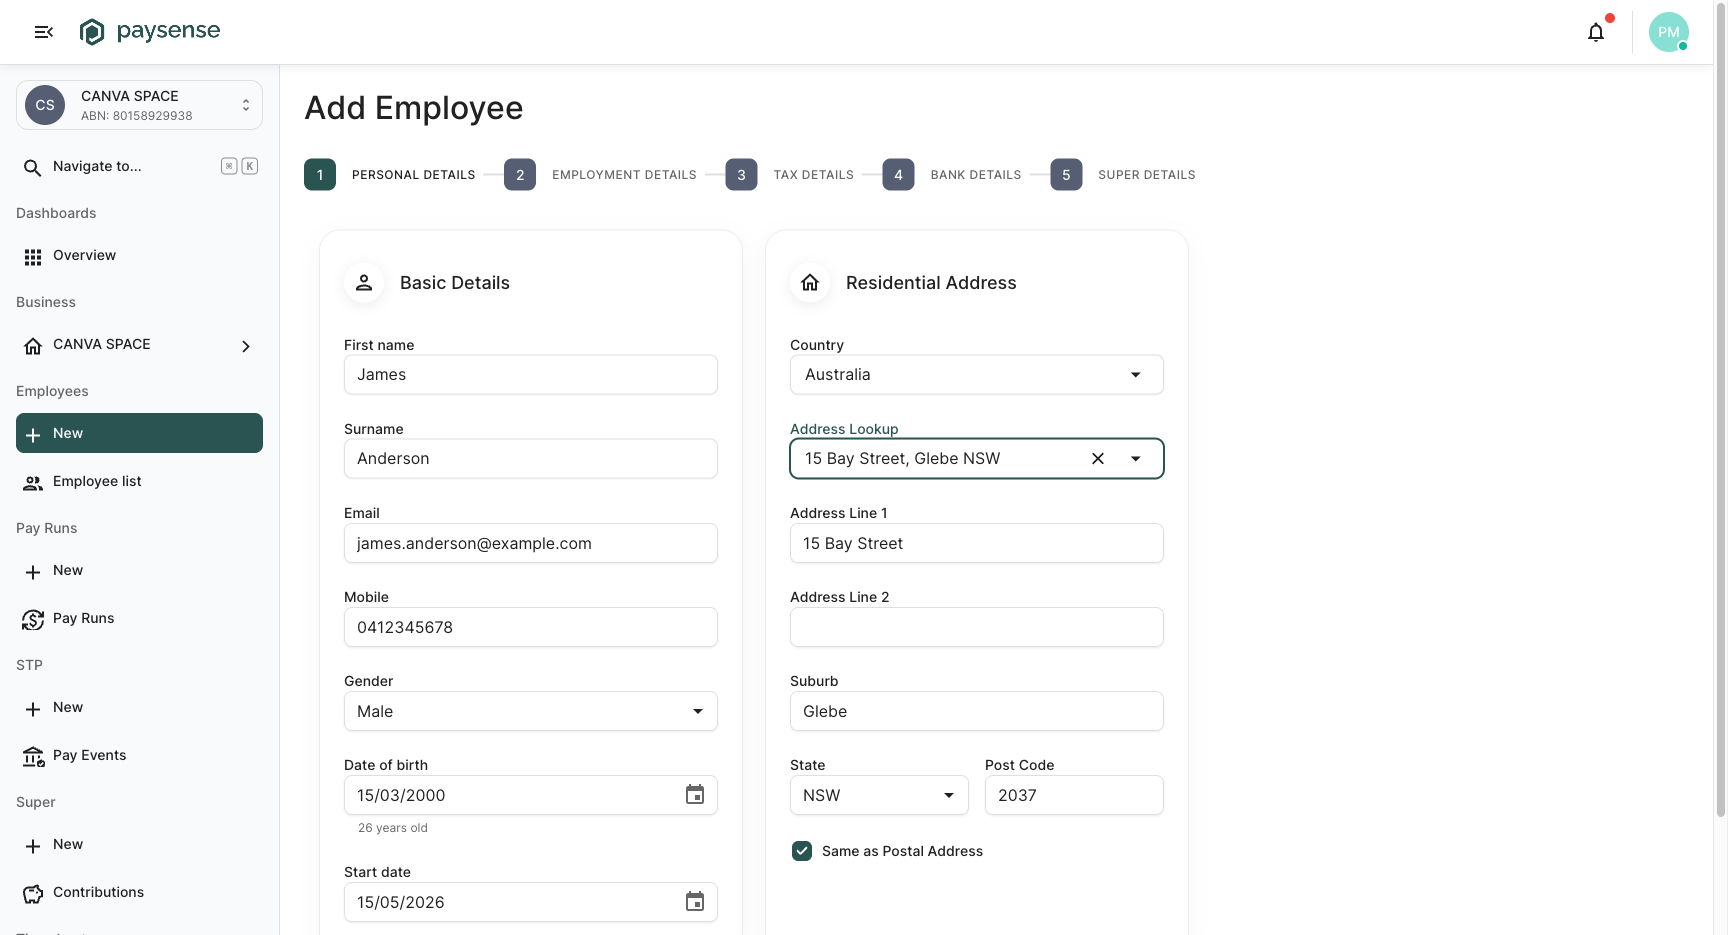
Click Continue. Paysense creates the employee record on the server, returns the new employee ID in the URL (/business/{businessId}/employees/add/{employeeId}/employment-details), and advances you to the next step.
After this point the employee exists in the database with status Draft. If you abandon the wizard now, you can resume by clicking the half-finished employee from the employees list - Paysense will drop you back on the step you left off.
Step 2: Fill in employment details
Employment Details decides how the employee is paid: their employment type, which pay cycle they belong to, their pay rate, and their default hours.
| Field | Required | Notes |
|---|---|---|
| Employment type | Yes | Full Time / Part Time / Casual - drives leave accruals and entitlements |
| Cost centre | Yes | Defaults to Main Office (Default) on a new business; pick a different one if you've created departments |
| Pay cycle | Yes | One of the cycles configured in Configure pay cycles |
| Timesheet earnings mode | Yes | Defaults to No Timesheets. Switch to a timesheet-driven mode if the employee submits timesheets and you want their hours imported automatically. |
| Primary pay type | Yes | The earnings code used for ordinary hours (e.g. Casual Hourly, Salary) |
| Pay rate | Yes | The dollar amount for one unit of the rate unit |
| Rate unit | Yes | Hourly / Daily / Monthly / Yearly - pairs with Pay rate |
| Days per week | Yes | Defaults to 5; used to compute weekly and yearly hour estimates |
| Hours per day | Yes | Defaults to the business's standard day (8 hours) when Use standard business hours is ticked. Untick to override per-employee. |
Click the Pay cycle dropdown. You'll see the three defaults plus any custom cycles on the business - including the Casuals - Fortnightly cycle from the previous tutorial.
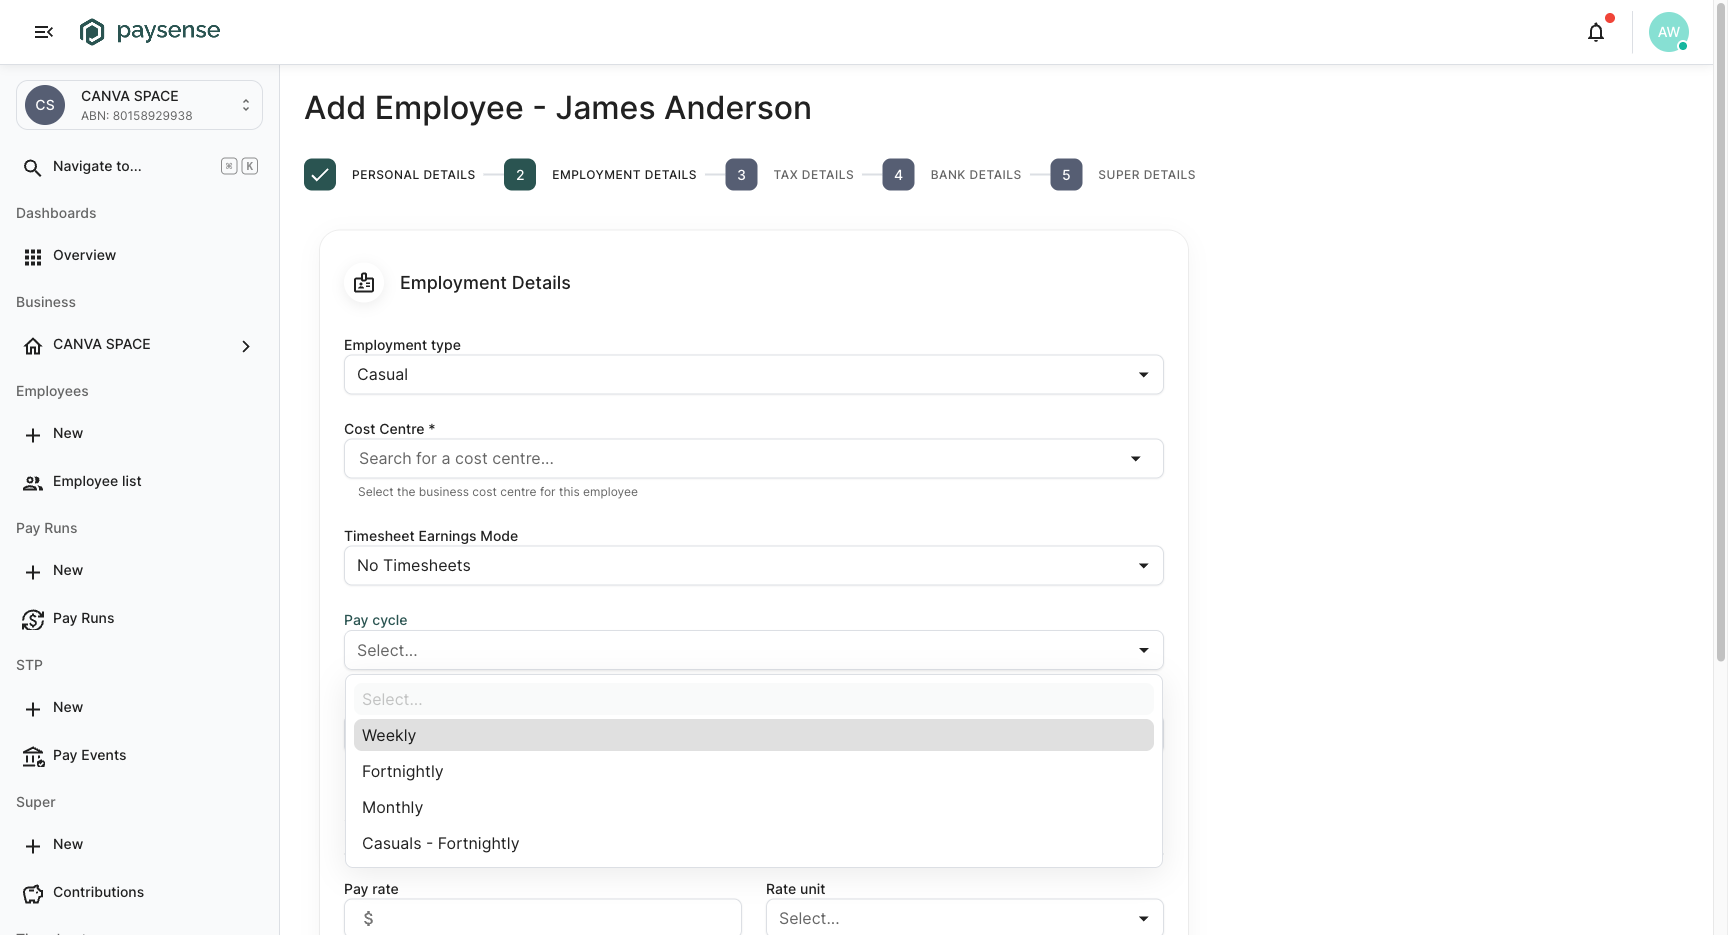
Select Casuals - Fortnightly and finish filling in the rest of the form. Paysense computes derived totals automatically as you type - at $42.00/hr times 8 hrs/day times 5 days/week, you should see 40 hrs/week and 2080 hrs/year appear under the rate fields.
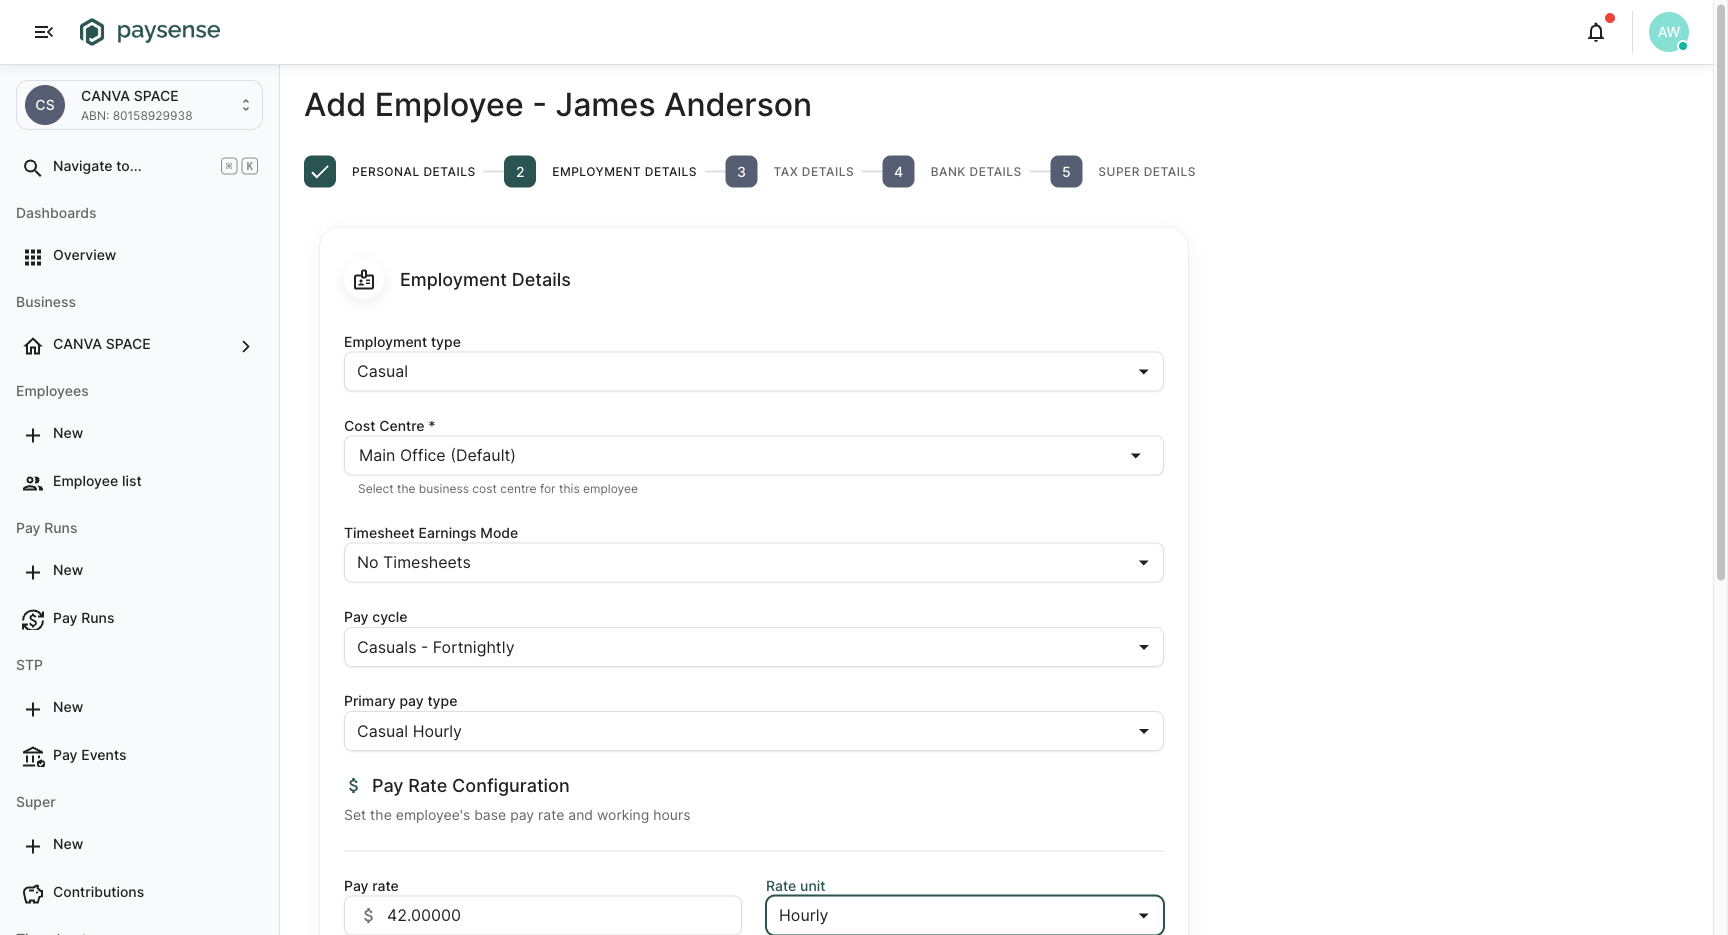
Click Continue to save and advance to the next step.
The Cost centre dropdown only shows cost centres defined for this business. If your business uses departments, head to the Cost Centres screen first and create them - they'll then appear here for every new employee you add.
Step 3: Fill in tax details
Tax Details captures the employee's TFN declaration. Paysense uses these answers when computing PAYG withholding on every pay run.
| Field | Required | Notes |
|---|---|---|
| Tax File Number | Yes | 8 or 9 digits. Paysense validates the checksum before letting you save. |
| Do you have a TFN Exemption? | No | Tick if the employee is exempt from quoting a TFN (e.g. under-18 with low earnings, or pension recipient). When ticked, Paysense substitutes the appropriate ATO exemption code in place of the TFN. |
| Claim Tax-Free Threshold | No | Tick if this is the employee's primary employer |
| Has Study and Training Loan | No | Tick if the employee has a HELP, VSL, SFSS, or other ATO study/training support loan - Paysense applies the additional Study and Training Support Loan (STSL) withholding |
| Residency Status | Yes | Australian / Foreign Resident - drives the withholding scale |
| Medicare Levy Surcharge | Yes, pre-filled None | Leave it as None unless the employee has elected to have MLS withheld via their TFN declaration; then set the tier (1/2/3). |
| Medicare Exemption | Yes, pre-filled None | Leave it as None unless the employee qualifies for an exemption (e.g. blind pensioner, prescribed person); then set Half or Full. |
| Medicare Levy Reduction | No | Tick Spouse and/or Dependent children if the employee qualifies for a reduction based on family income |
| Tax Category | Yes | Auto-defaults to Regular once residency is set; change for specialist scenarios (e.g. Seniors and Pensioners) |
In a dev or test environment Paysense exposes a Generate Test TFN button under "Developer Settings" that produces a TFN with a valid checksum so you can move through the wizard without using a real number. For our example, click it to populate the TFN, tick Claim Tax-Free Threshold, and set Residency Status to Australian. The Tax Category will auto-populate to Regular.
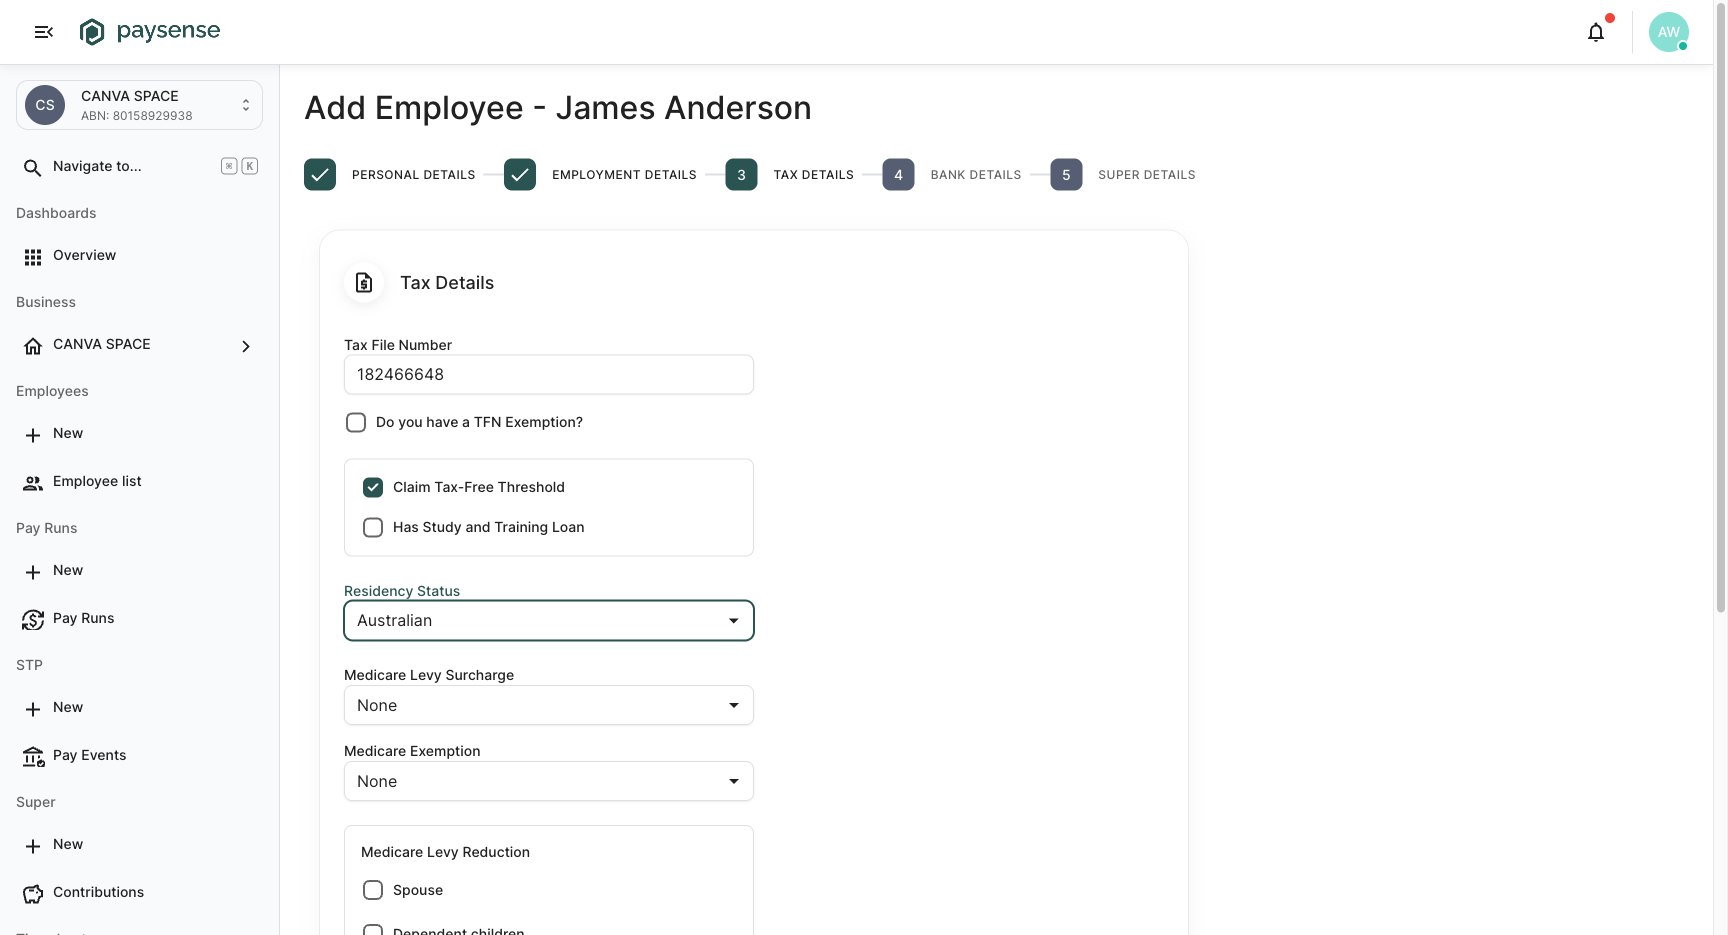
Click Continue. Paysense saves the TFN declaration and moves you to the next step. You'll see a small "Tax details saved successfully" toast in the bottom-right.
The Generate Test TFN button is only visible in dev mode. In a production tenant you must enter the real TFN from the employee's TFN declaration form. Never use a generated TFN for a real employee - it will fail STP validation when the pay run is filed with the ATO.
Step 4: Fill in bank details
Bank Details tells Paysense where to deposit the employee's net pay each pay run.
| Field | Required | Notes |
|---|---|---|
| Account Type | Yes | Defaults to Electronic (EFT). Switch to Cash or Cheque only for legacy payment methods. |
| Account Name | Yes | The name on the bank account - usually the employee's full name |
| Account Number | Yes | Up to 9 digits |
| BSB | Yes | 6 digits, no hyphens |
| Payment allocation | Yes | Defaults to Entire balance. Split allocations are supported via the Add Account button for advanced cases. |
Fill in the account name, account number, and BSB. Leave Account Type on Electronic and Payment allocation on Entire balance.
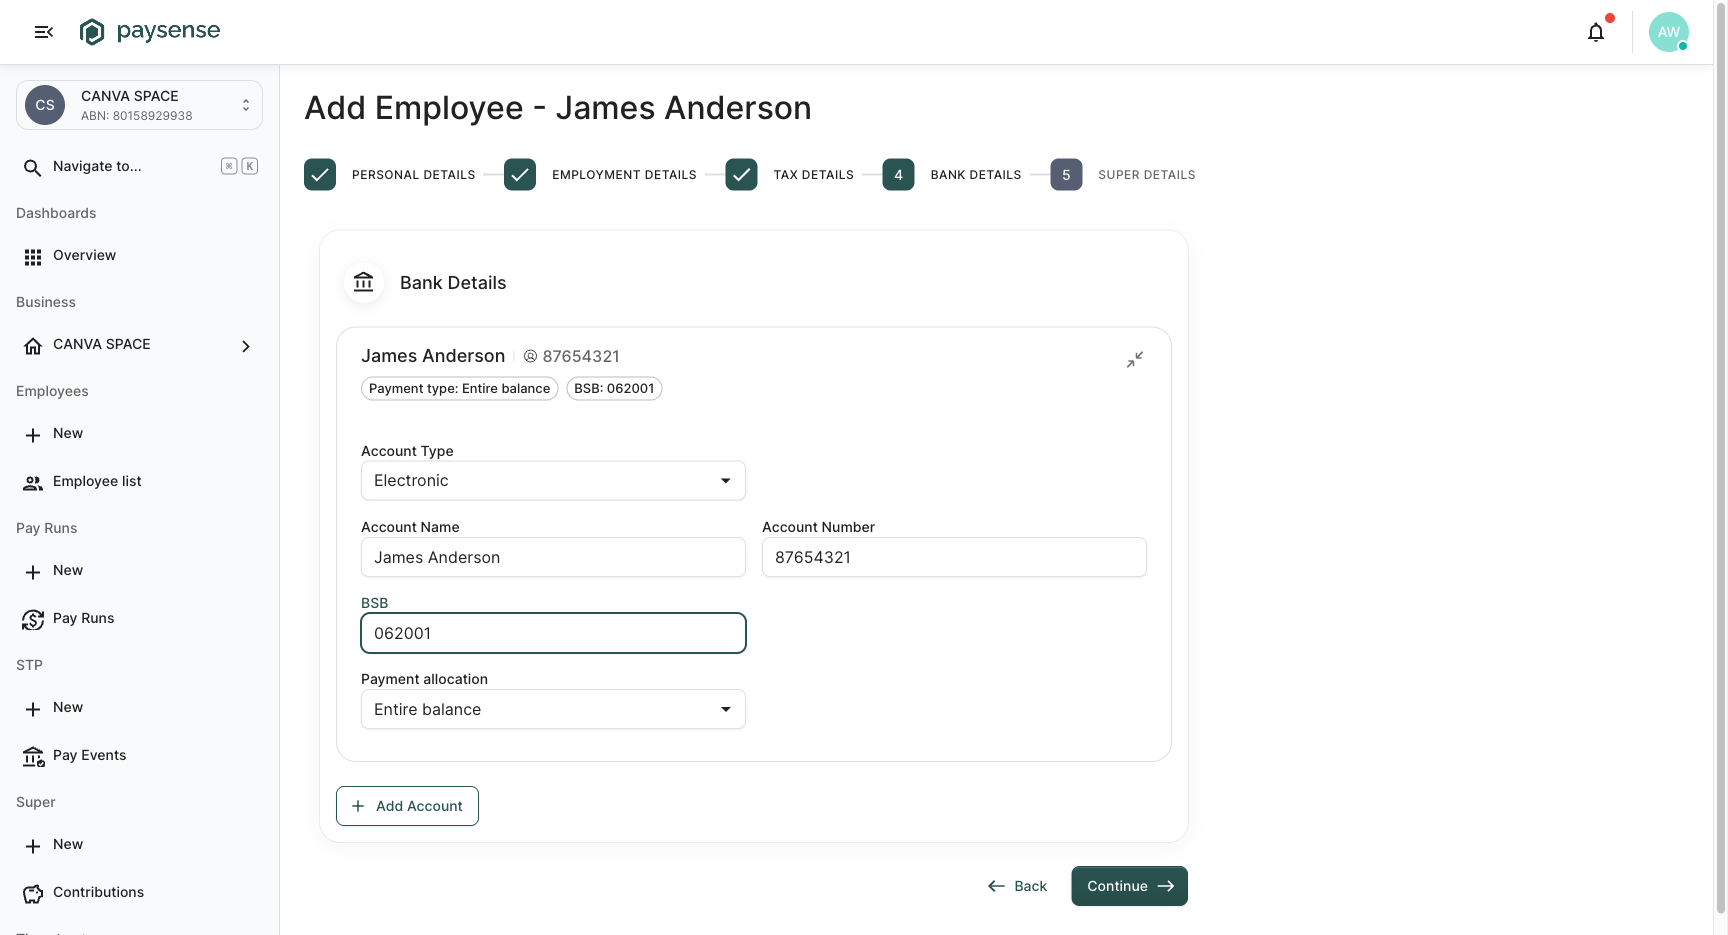
Click Continue to save and move to the final step.
Paysense validates the BSB against the published bank list. If you enter a BSB that doesn't exist (e.g. 999999), the form will block you with an inline error before you can continue.
Step 5: Fill in super details
Super Details records the fund Paysense will pay the employee's Super Guarantee into each quarter (or pay run, depending on your business's super contribution schedule).
| Field | Required | Notes |
|---|---|---|
| Super fund type | Yes | Defaults to Regulated Super Fund. Switch to SMSF if the employee uses a self-managed super fund (the form will then prompt for the SMSF's bank details). |
| Payment allocation | Yes | Defaults to Entire balance. Split contributions across multiple funds via the Add Super Fund button. |
| Super fund | Yes | Looked up live against the ASIC fund register by name, ABN, or USI |
| Member number | Yes | The employee's membership number with that fund |
Leave Super fund type on Regulated Super Fund and Payment allocation on Entire balance. Click the Super fund field and start typing the name of the fund - for example, australiansuper. After a short pause, Paysense queries the ASIC registry and shows matching funds in a dropdown.
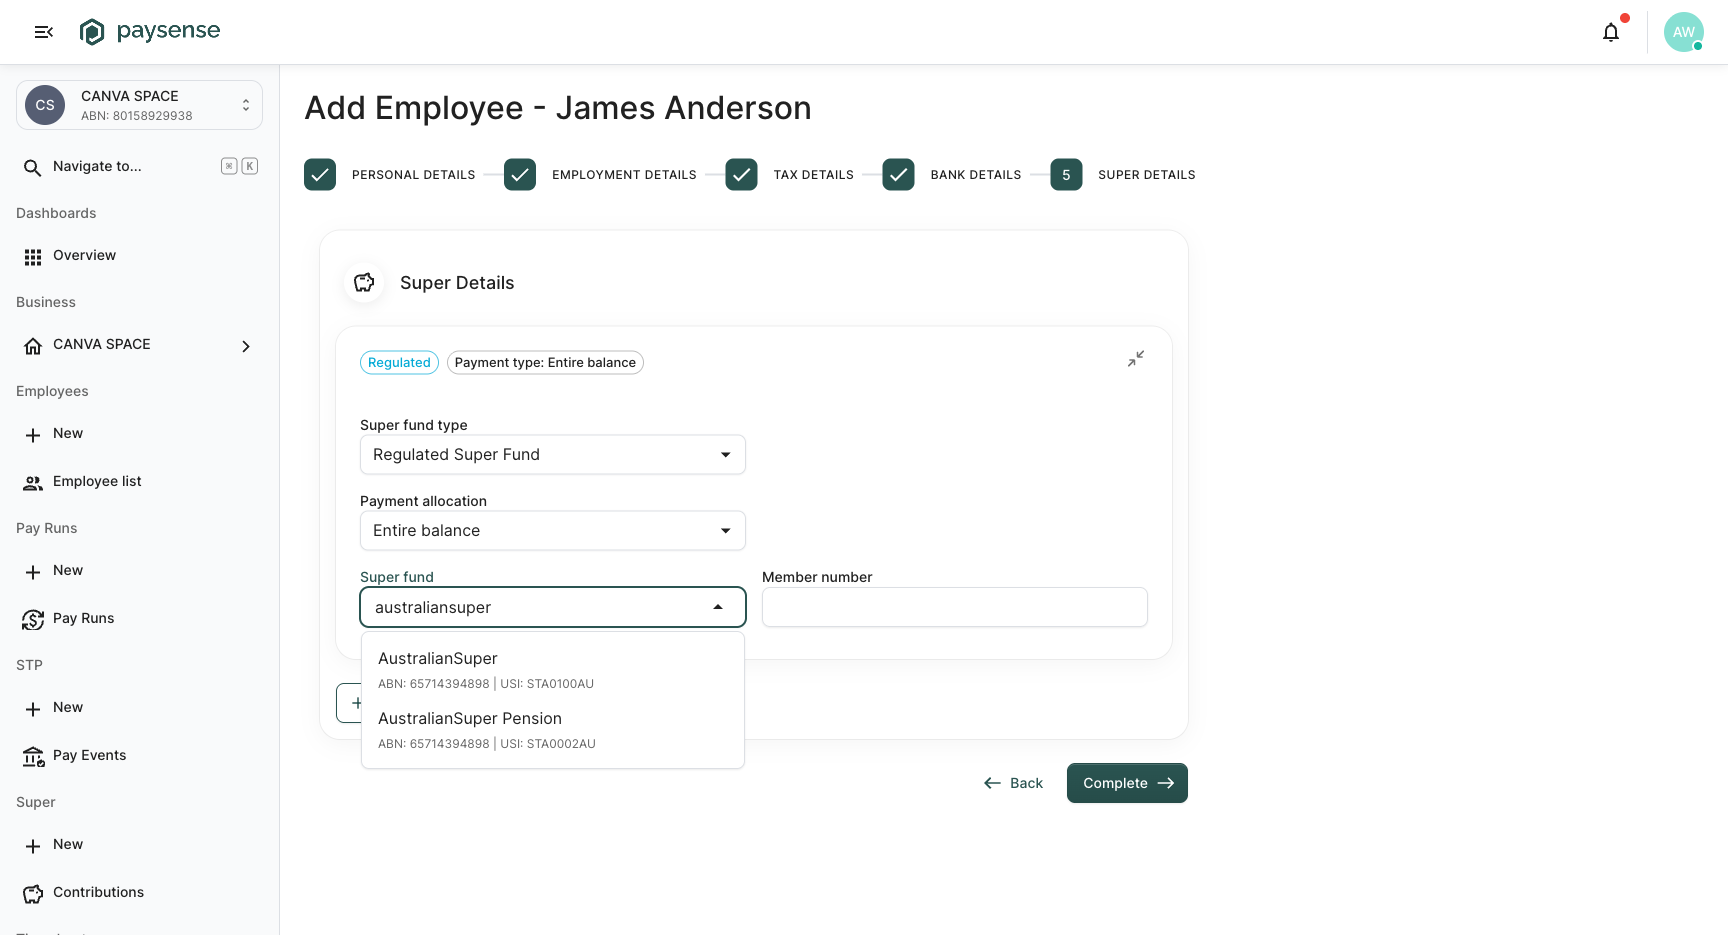
Each result shows the fund name, ABN, and USI. Pick the entry that matches the employee's fund - for our example, AustralianSuper with ABN 65714394898 and USI STA0100AU. Then enter the employee's membership number.
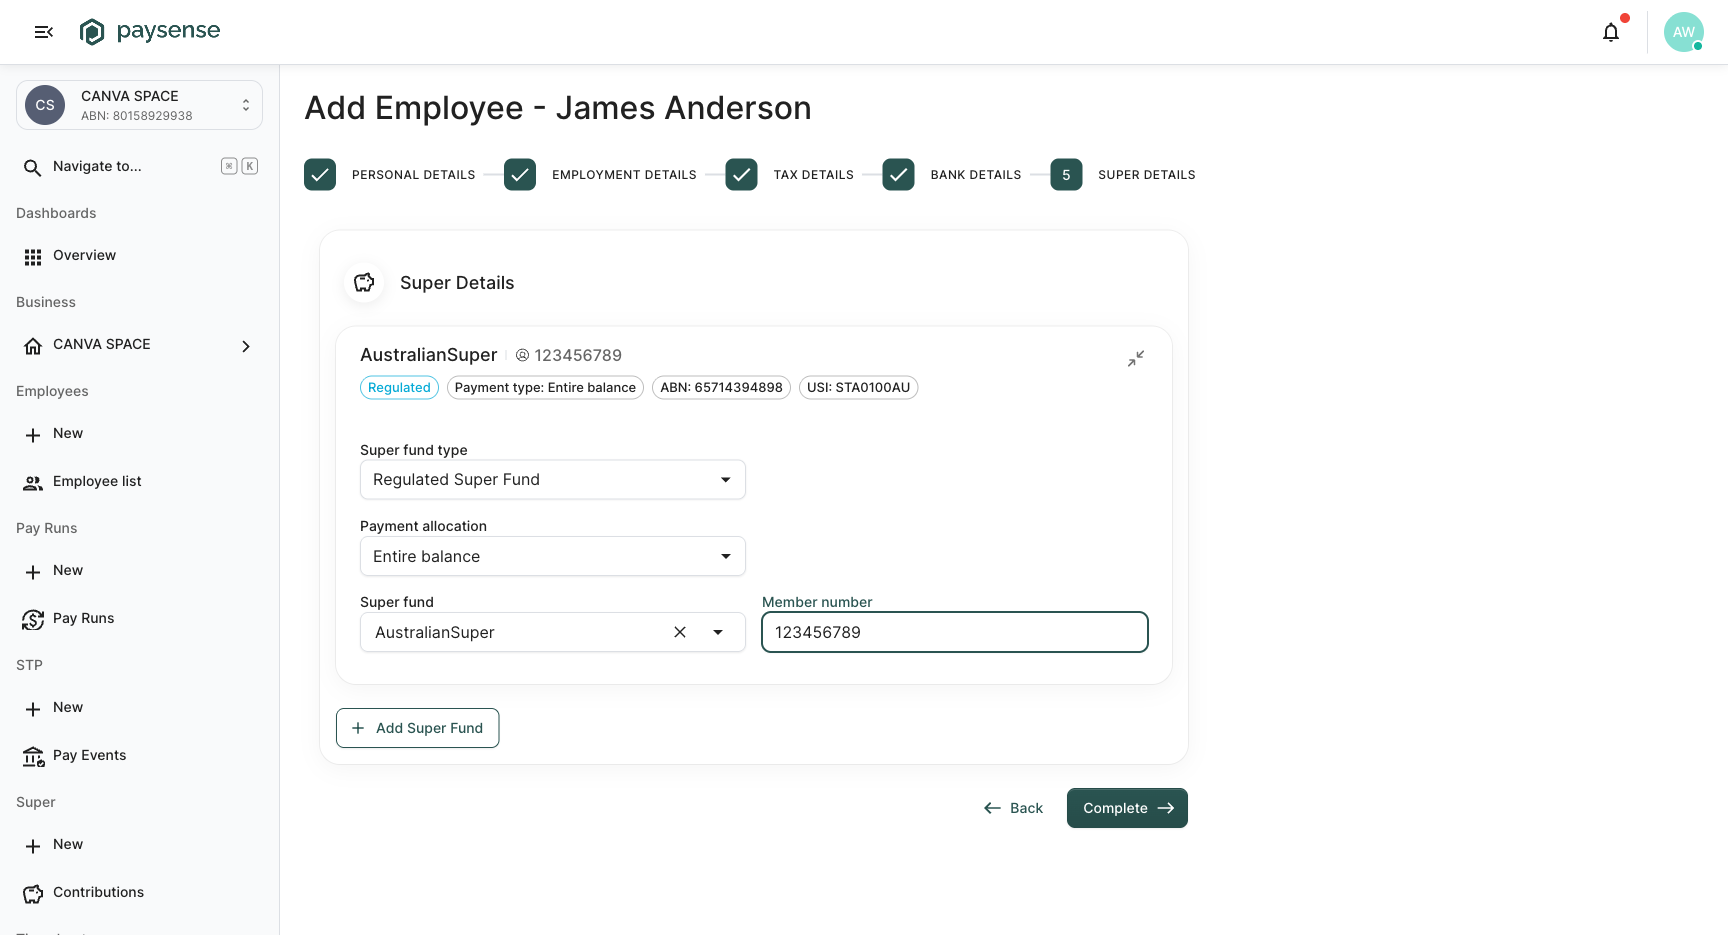
Click Complete to finalise the wizard.
For self-managed super funds (SMSFs), search by ABN instead of name. Paysense will return the SMSF and prompt you for the SMSF's bank details so it can pay contributions directly into the fund's clearing account.
Step 6: Confirmation
Once the final step saves, Paysense flips the employee's status from Draft to Active and shows a success page.
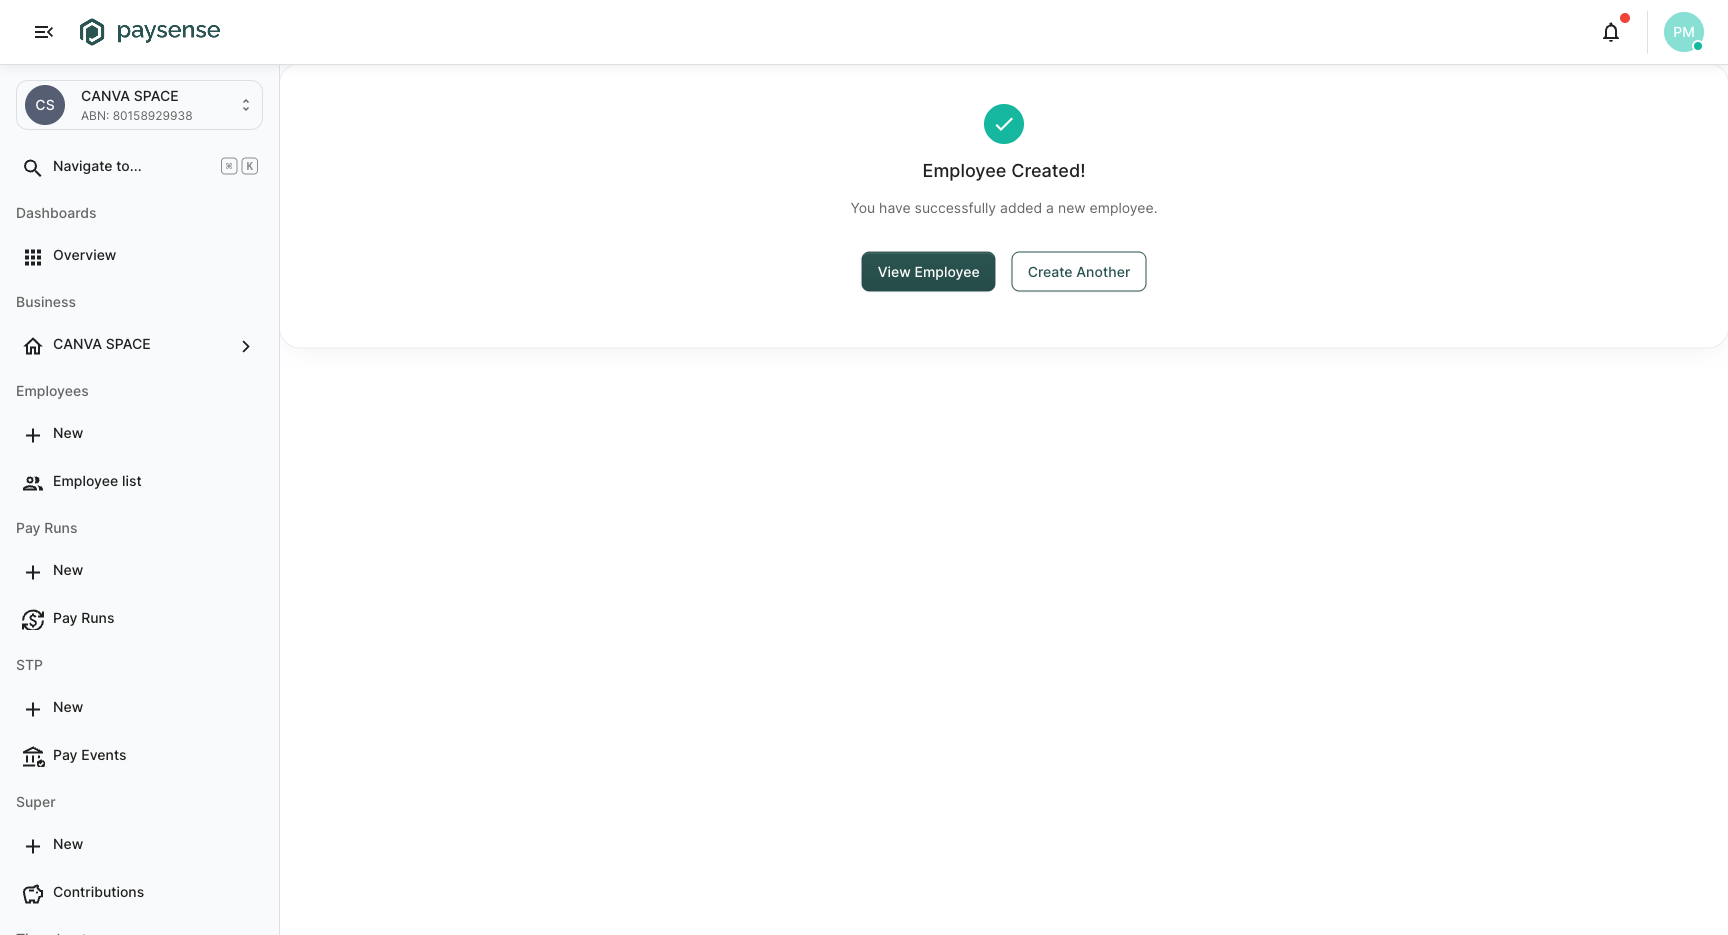
From here you can:
- View Employee - jump straight to the employee's profile page to review or edit any of the details you just entered
- Create Another - relaunch the wizard at Step 1 to add the next employee
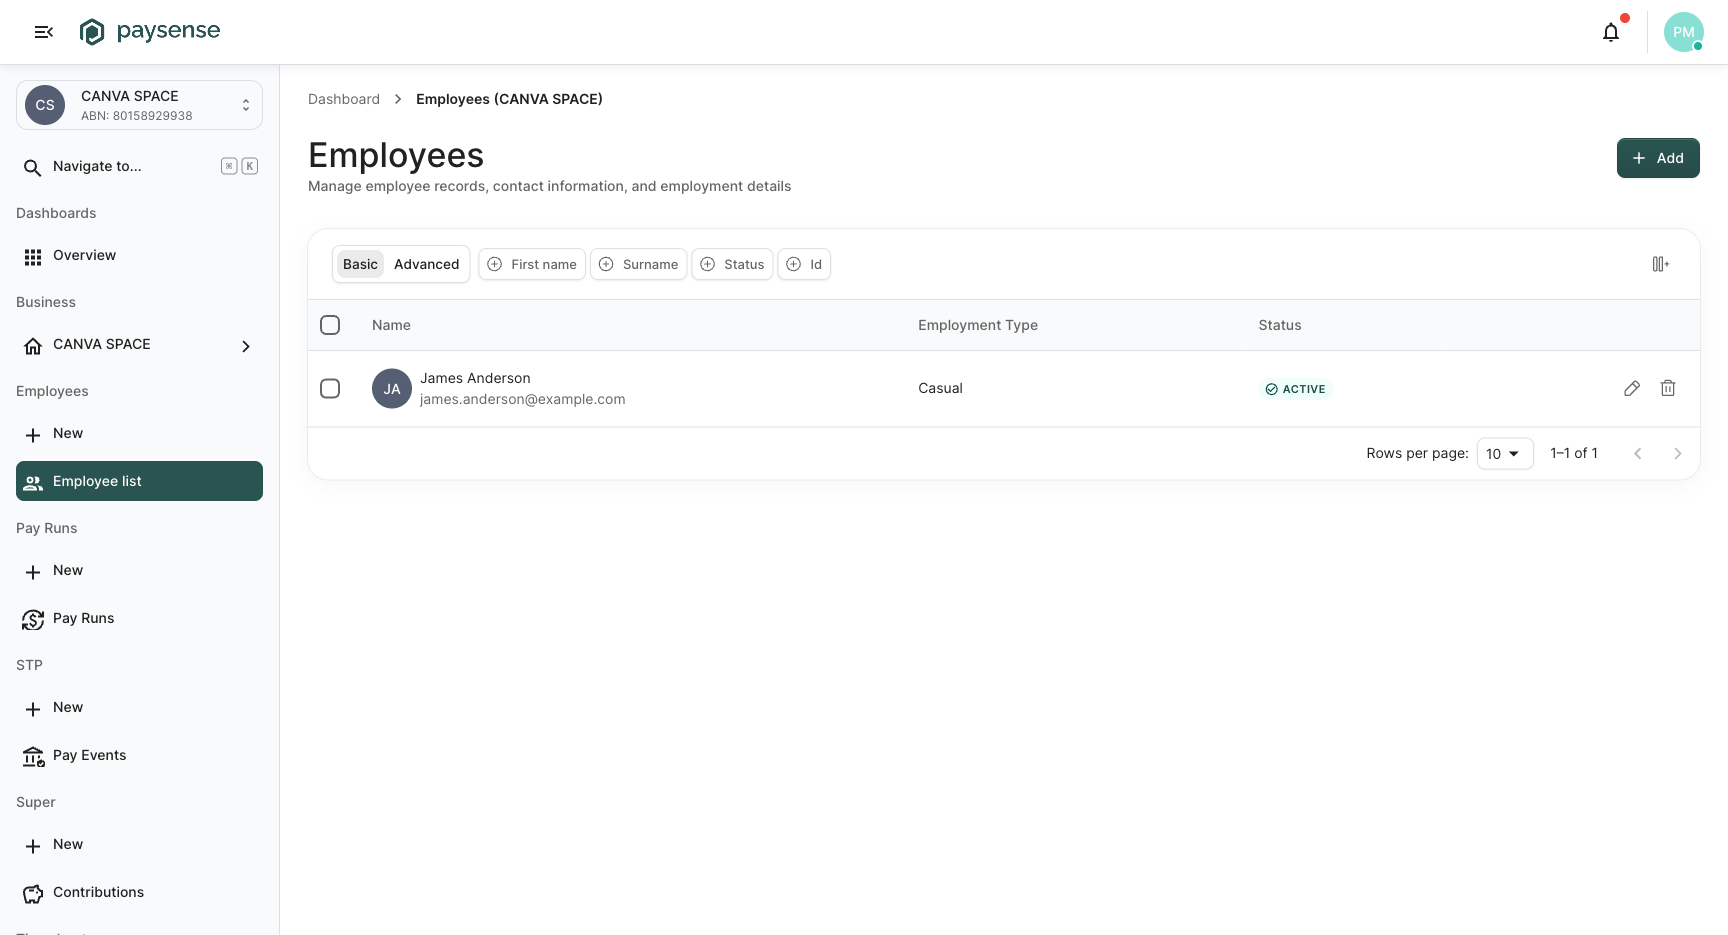
Head back to the employees list (/business/{businessId}/employees) and you'll see your new hire in the grid, marked Active and listed as a Casual employee.
What's next
Now that you've added your first employee, the next steps are:
- Add the rest of your team - repeat this wizard for each employee, or bring several in at once from a file with Import employees.
- Run your first pay run - Paysense will automatically pick James up in the next Casuals - Fortnightly pay run. See Run your first pay run.
- Edit employment details later - most fields can be changed from the employee's profile, including pay rate, cost centre, and pay cycle. Mid-period changes can affect the next pay run, so make them at the start of a fresh period where possible.
Troubleshooting
| Symptom | Likely cause | What to do |
|---|---|---|
| Continue button is disabled | One or more required fields are empty or invalid | Scroll up - invalid fields will have a red error message underneath |
| TFN field rejects a 9-digit number | The number fails the TFN checksum | Double-check the TFN against the declaration form. In dev mode, click Generate Test TFN instead. |
| BSB field shows an inline error | The BSB isn't on the published bank list | Confirm the BSB with the employee - bank branch closures sometimes invalidate older BSBs |
| Pay cycle dropdown is missing your custom cycle | The wizard was opened before the cycle was created | Refresh the page so the dropdown re-fetches the cycle list |
| Super fund search returns no results | The fund name is misspelled or the ASIC registry call timed out | Try searching by ABN or USI instead, or wait a few seconds and retry |
| Wizard advances but no toast appears | The save call succeeded but the toast was dismissed before you saw it | Refresh the page; the data is already saved - the toast is purely cosmetic |
| Returning to a half-finished employee lands on Step 1 | The employee record was never created (the first Continue click failed) | Re-enter the personal details and click Continue again |
If you hit a problem the table doesn't cover, the Notifications panel on the business dashboard logs every employee-creation event - check there for the underlying error message.