Invite a team member
Adding a colleague to a Paysense business is a two-stage process:
- You send an invite from the Invitations screen with the colleague's name, email, and a starting set of permissions.
- They click the link in the resulting email, sign in (or create their account), and become a full member of the business.
This tutorial walks through stage 1 end-to-end and shows what stage 2 looks like from your side (the pending invitation row and the actions available on it).
The invite dialog uses the same scope picker as the Manage permissions screen, so you can grant a role preset (Payroll Admin, Payroll Manager, etc.) at invite time instead of editing it later.
What you'll need
| Item | Required | Notes |
|---|---|---|
| The Manage team scope | Yes | Specifically team:write. Owners always have it; other roles need Team (Edit) granted from the Manage permissions screen. |
| The colleague's full name | Yes | First name and last name are both required and capped at 100 characters |
| The colleague's work email | Yes | Paysense validates the format and looks the address up against the business + system-wide invite/member records |
| A clear idea of their role | Recommended | Pick a role preset up-front rather than leaving it at the default Payroll Admin |
You can change permissions any time after they accept - the invite just sets the starting scope set. If you're unsure, pick the most restrictive role that still lets them do their job; you can always grant more later from the Members tab.
Step 1: Open the Invitations screen
From the left-hand sidebar of your business, click Team > Invitations. You'll land on the invitations list at /business/{businessId}/team/invite.
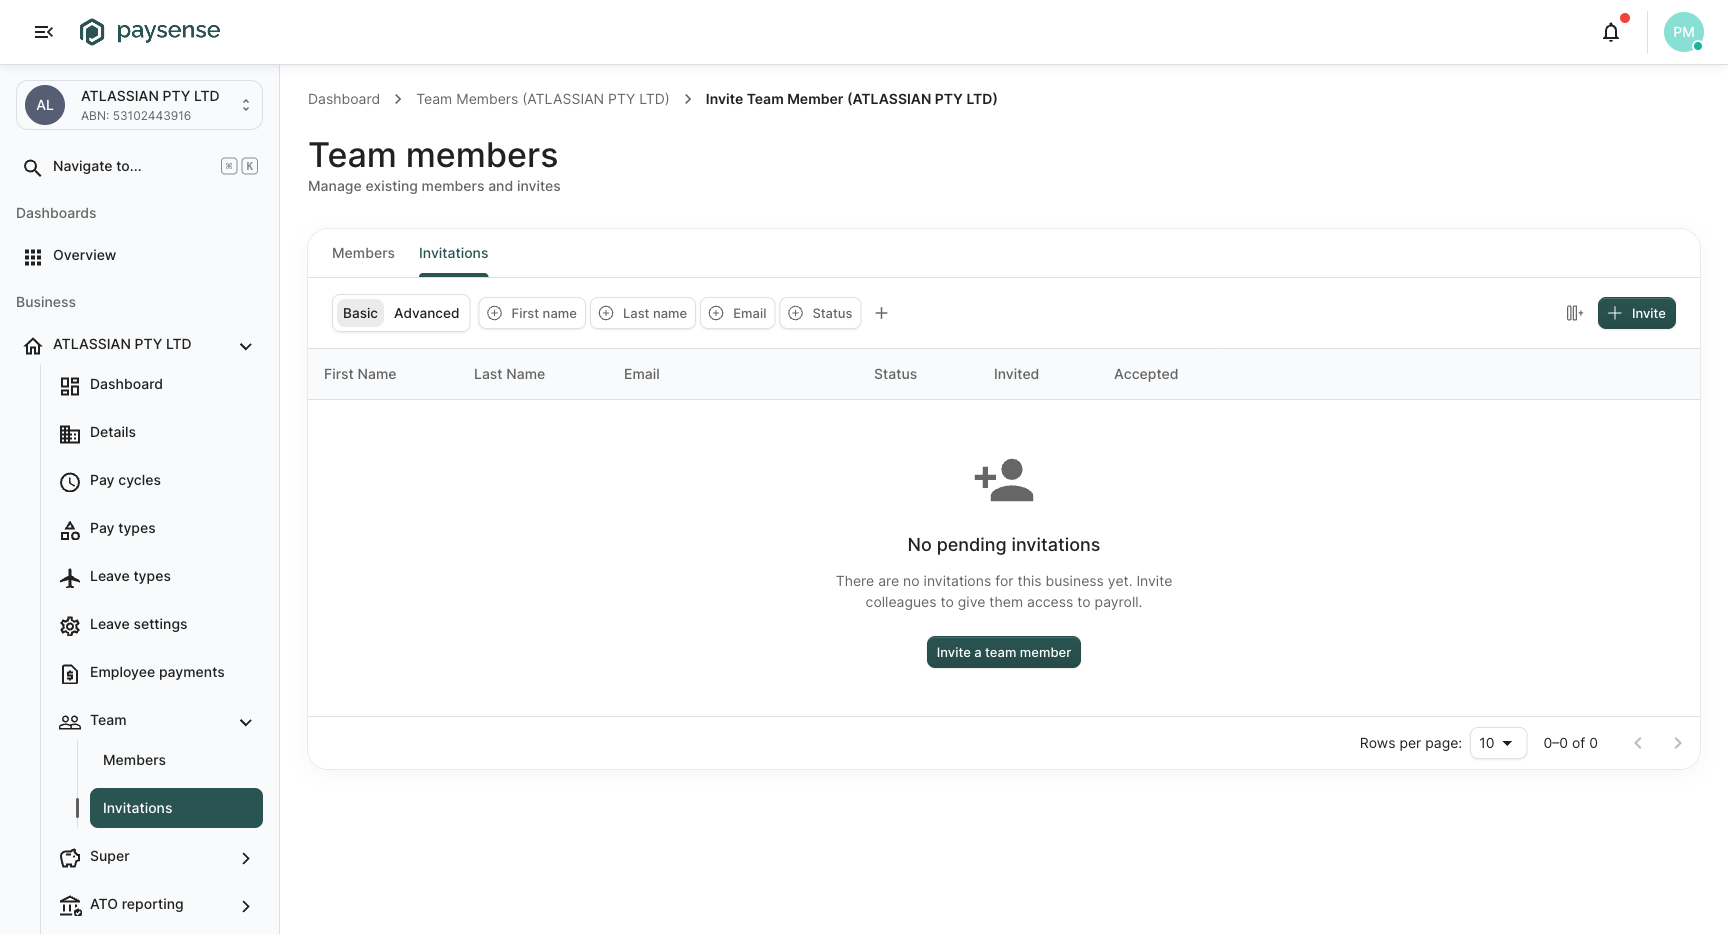
A brand-new business has no pending invites. You'll see the empty state with a single call to action: Invite a team member. Either that button or the Invite button in the toolbar opens the same dialog.
The table headers explain everything an invite tracks:
| Column | What it shows |
|---|---|
| First Name / Last Name | The values you entered when sending the invite |
| The address the invite was sent to | |
| Status | Pending (waiting on the user to accept), Completed (accepted), Failed (email delivery failed), or Expired (link timed out without being clicked) |
| Invited | Relative time since you clicked Send Invite (e.g. "3 hours ago") |
| Accepted | Relative time since the user accepted, or - if still pending |
| Actions | Resend Invite and Delete Invite - see Step 5 |
Step 2: Open the invite dialog
Click Invite. The Invite Team Member dialog opens centred on the screen with three sections: a name + email block, a permissions block, and an action footer with Cancel and Send Invite.
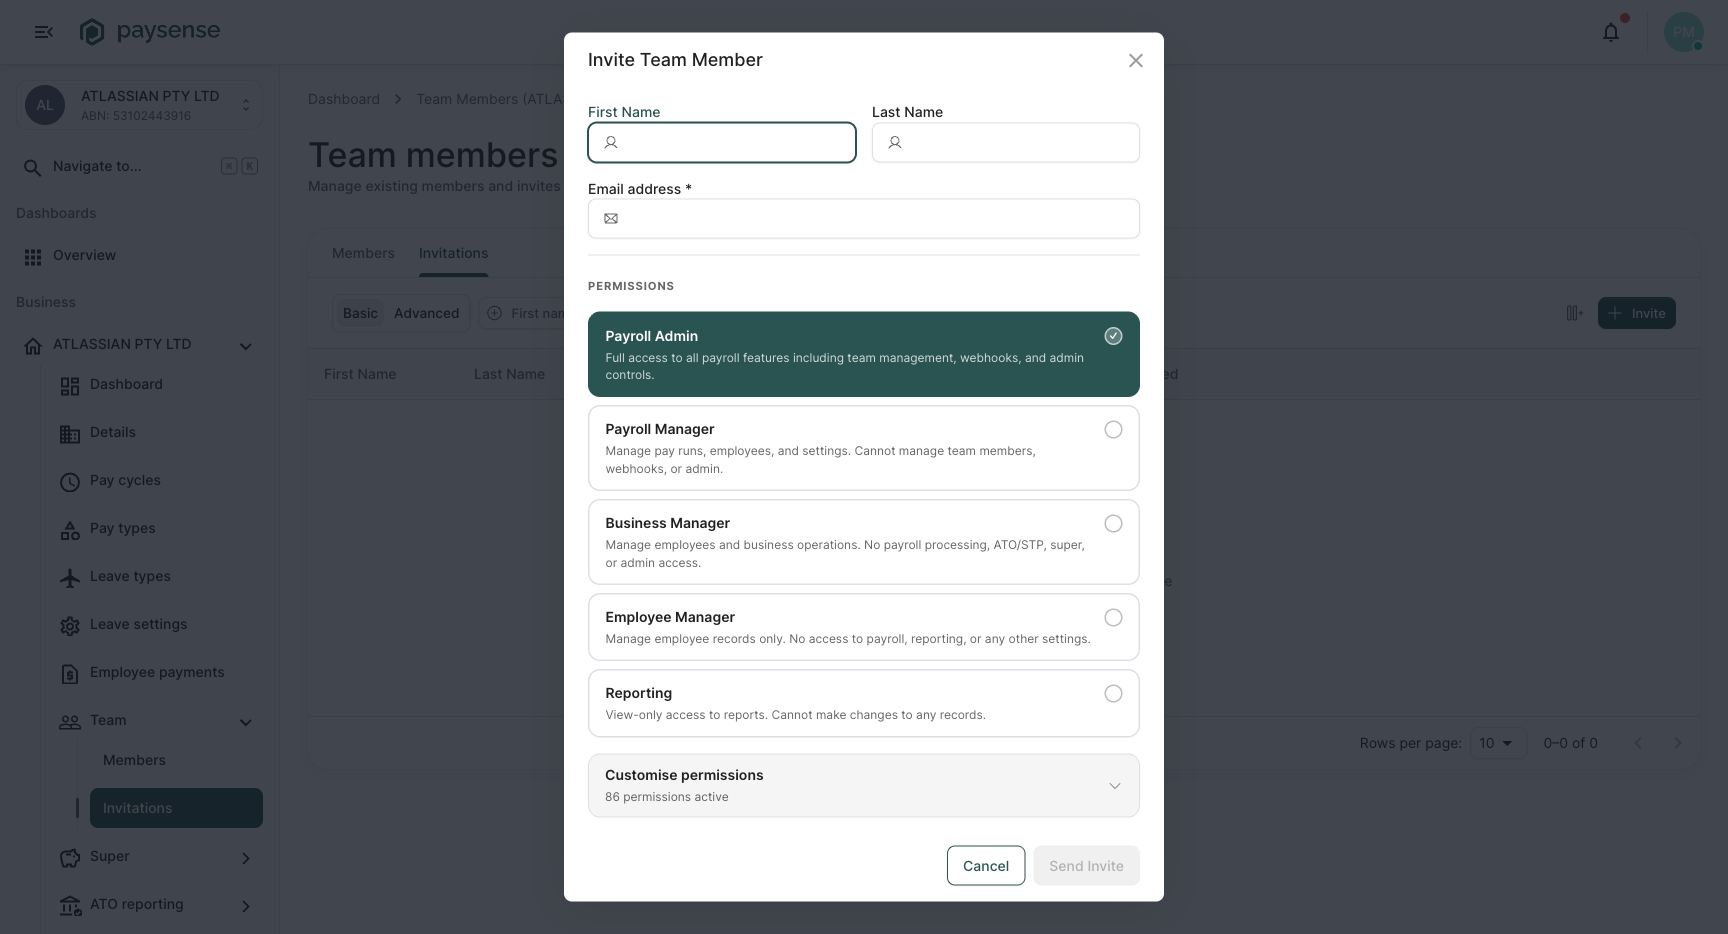
The Send Invite button is disabled until:
- All three required fields (First Name, Last Name, Email) pass validation, and
- The email validation lookup confirms the address can receive a new invite for this business.
The dialog defaults to the Payroll Admin role preset - convenient for inviting another owner-like user, but think twice before sending to someone who shouldn't have full admin access.
Step 3: Fill in the colleague's details
Type the colleague's first name, last name, and email into the three fields.
| Field | Constraints | Notes |
|---|---|---|
| First Name | Required, max 100 chars, trimmed on submit | The dialog auto-focuses this field when it opens |
| Last Name | Required, max 100 chars, trimmed on submit | |
| Email address | Required, must be a valid email format | Validated on the server after a short debounce (400 ms) to confirm it can receive an invite |
As soon as you stop typing in the email field, Paysense looks the address up and shows one of four callouts under the field:
| Callout | Meaning | What to do |
|---|---|---|
| Success: "This email address can be invited. A new user account will be created if they accept." | The address is brand-new to Paysense | Pick a role and send |
| Success: "This user already has an account. Sending an invite will add them to this business." | The user has signed in to Paysense before for another business | Pick a role and send - they'll skip the account-creation step |
| Info: "This user already has an active pending invite for this business." | You (or a colleague) already invited them and they haven't accepted | Use Resend Invite on the existing row instead |
| Warning: "This user is already a member of this business." | They're already on the Members tab | Head to Team > Members and use Manage permissions instead |
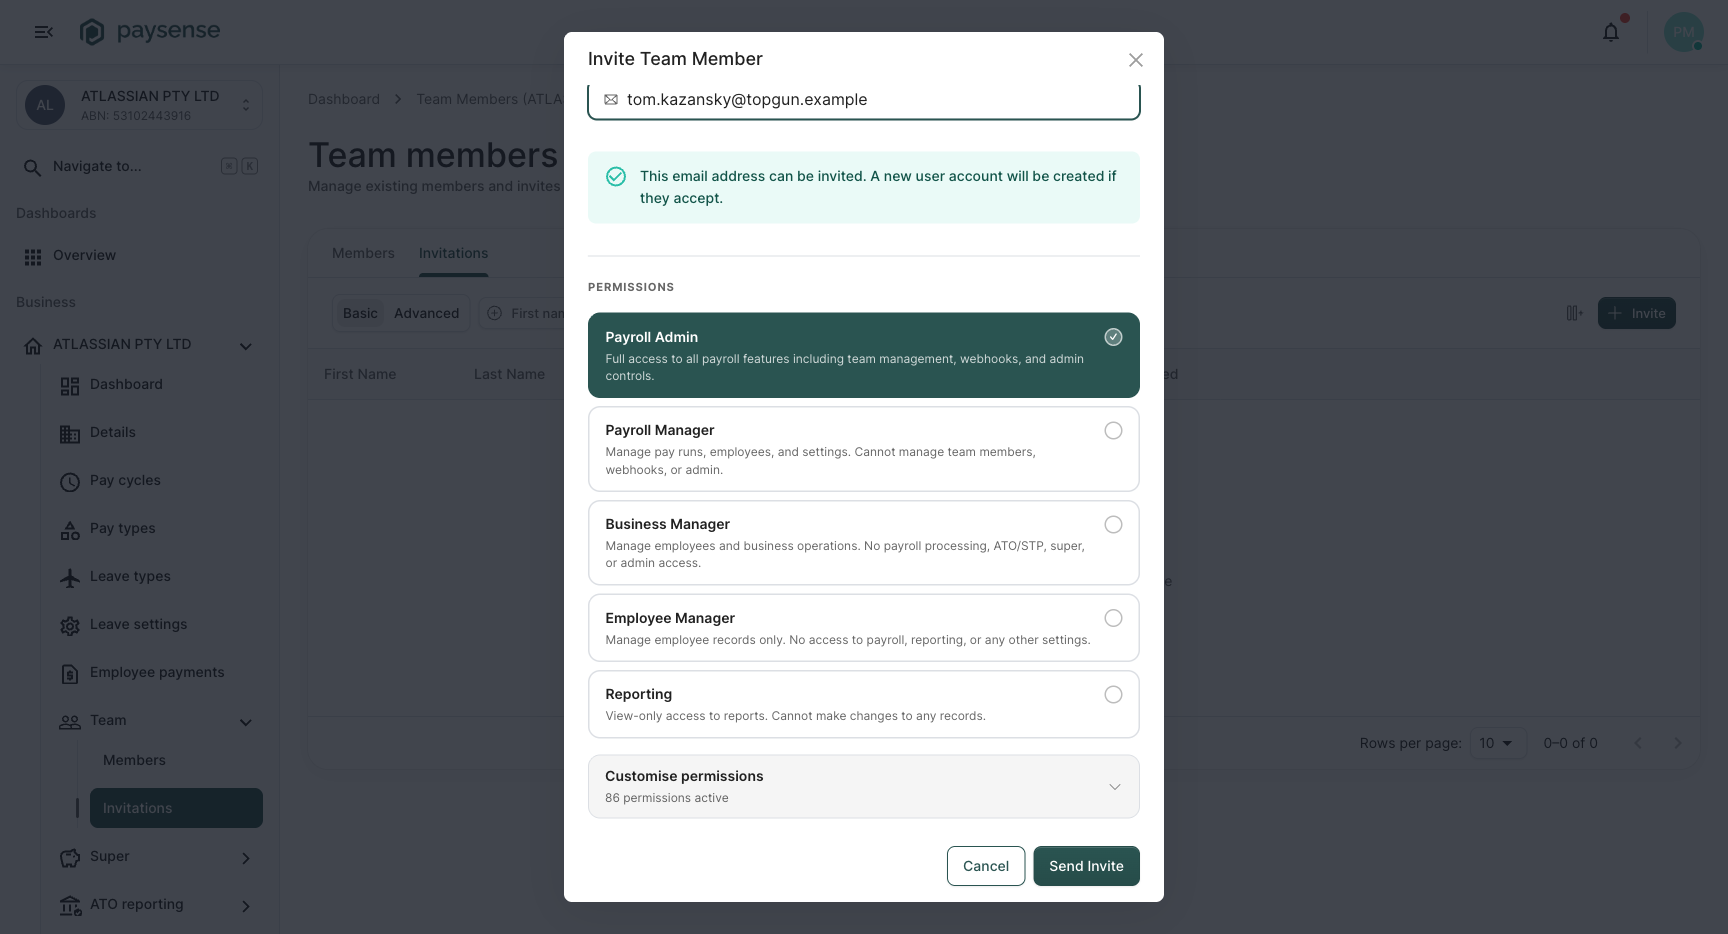
The email lookup runs on every change, debounced by 400 ms. If you correct a typo quickly the warning will refresh automatically - you don't need to click anywhere to re-trigger it.
Step 4: Pick a role and (optionally) customise permissions
The Permissions block at the bottom of the dialog is identical to the picker on the Manage permissions screen. Pick the role preset that best matches what your colleague should be able to do:
- Payroll Admin - full access. Use for additional owners, finance managers, or external bookkeepers you fully trust.
- Payroll Manager - all payroll operations, no team or webhook management.
- Business Manager - employees, leave, timesheets, cost centres. No payroll processing or super.
- Employee Manager - employee CRUD only.
- Reporting - read-only access to reports.
For more detail on each preset, including the exact scopes they grant, see Step 2: Pick a role preset in the Manage permissions guide.
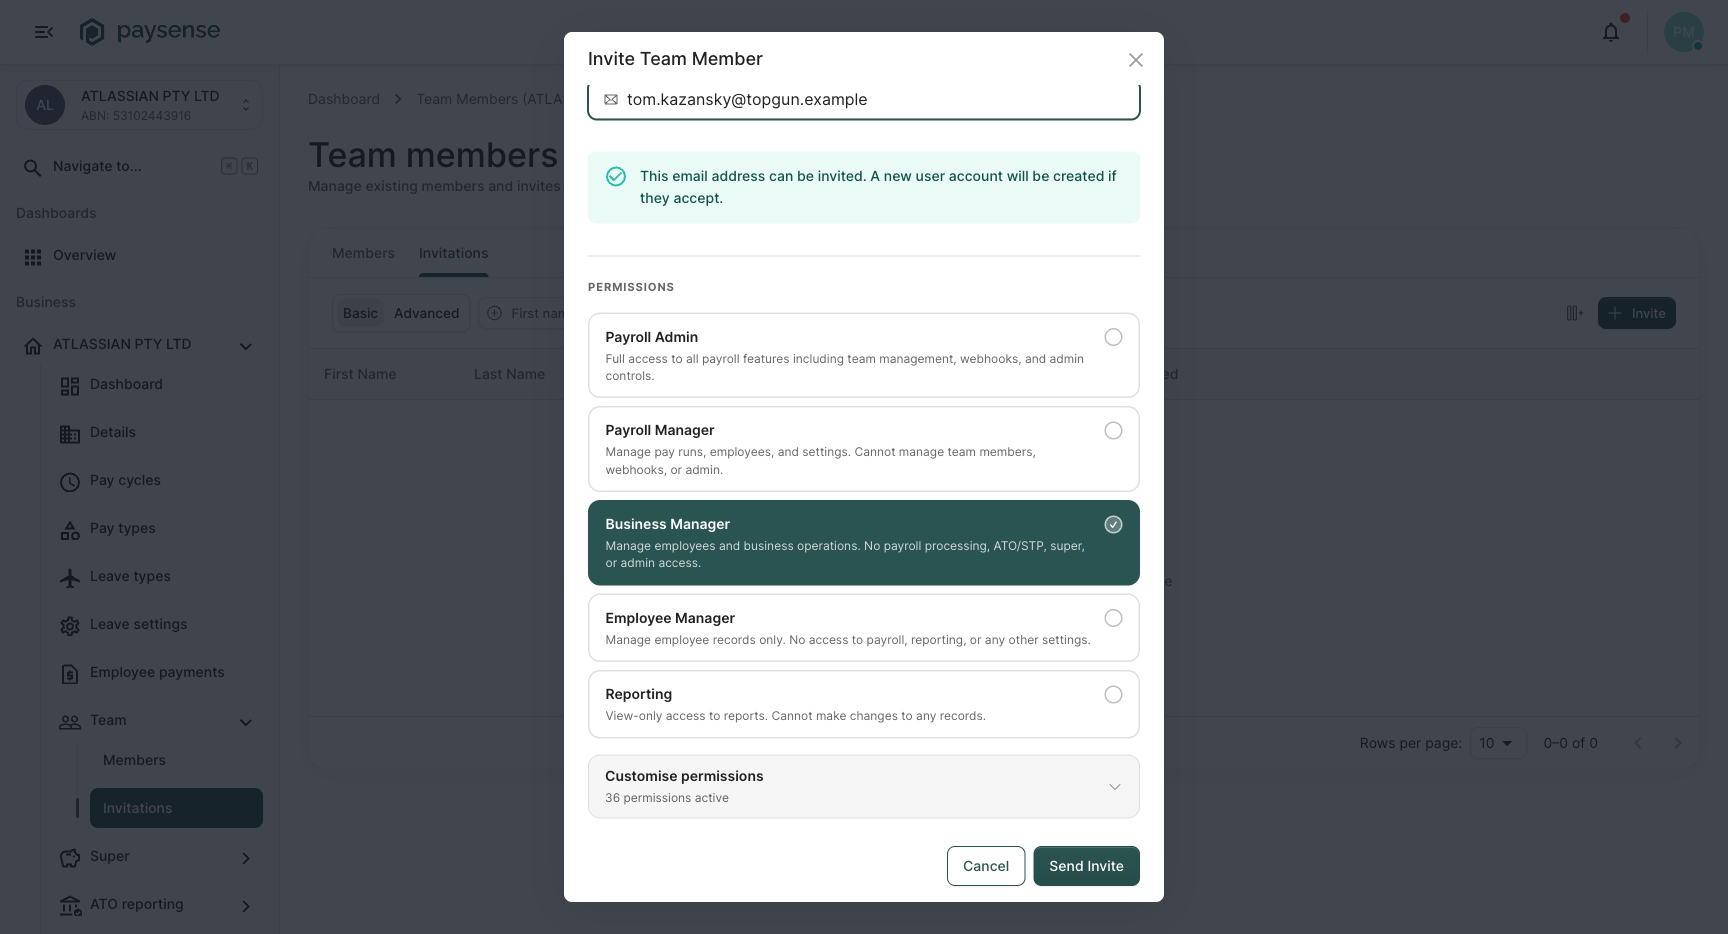
Need finer-grained control? Expand Customise permissions to toggle individual scopes - the advanced scope picker works exactly the same way here as on the Manage permissions screen, including locked scopes.
Once everything looks right, click Send Invite.
Avoid sending an invite at the Payroll Admin level "just for now". The colleague will be a full admin from the moment they accept, which on a busy business may be seconds after you click Send. Pick the right preset up-front.
What happens on click
After Send Invite Paysense:
- Creates a Pending invite record in the database and emails a one-time invite link to the address.
- Shows a success toast in the bottom-right corner. The exact wording depends on whether the user already had an account:
- "Invite sent" when the user is new to Paysense.
- "User added" when the user already exists; the invite is auto-accepted on their next sign-in.
- Closes the dialog and refreshes the invitations table.
The new row appears with Status: Pending and Invited: just now.
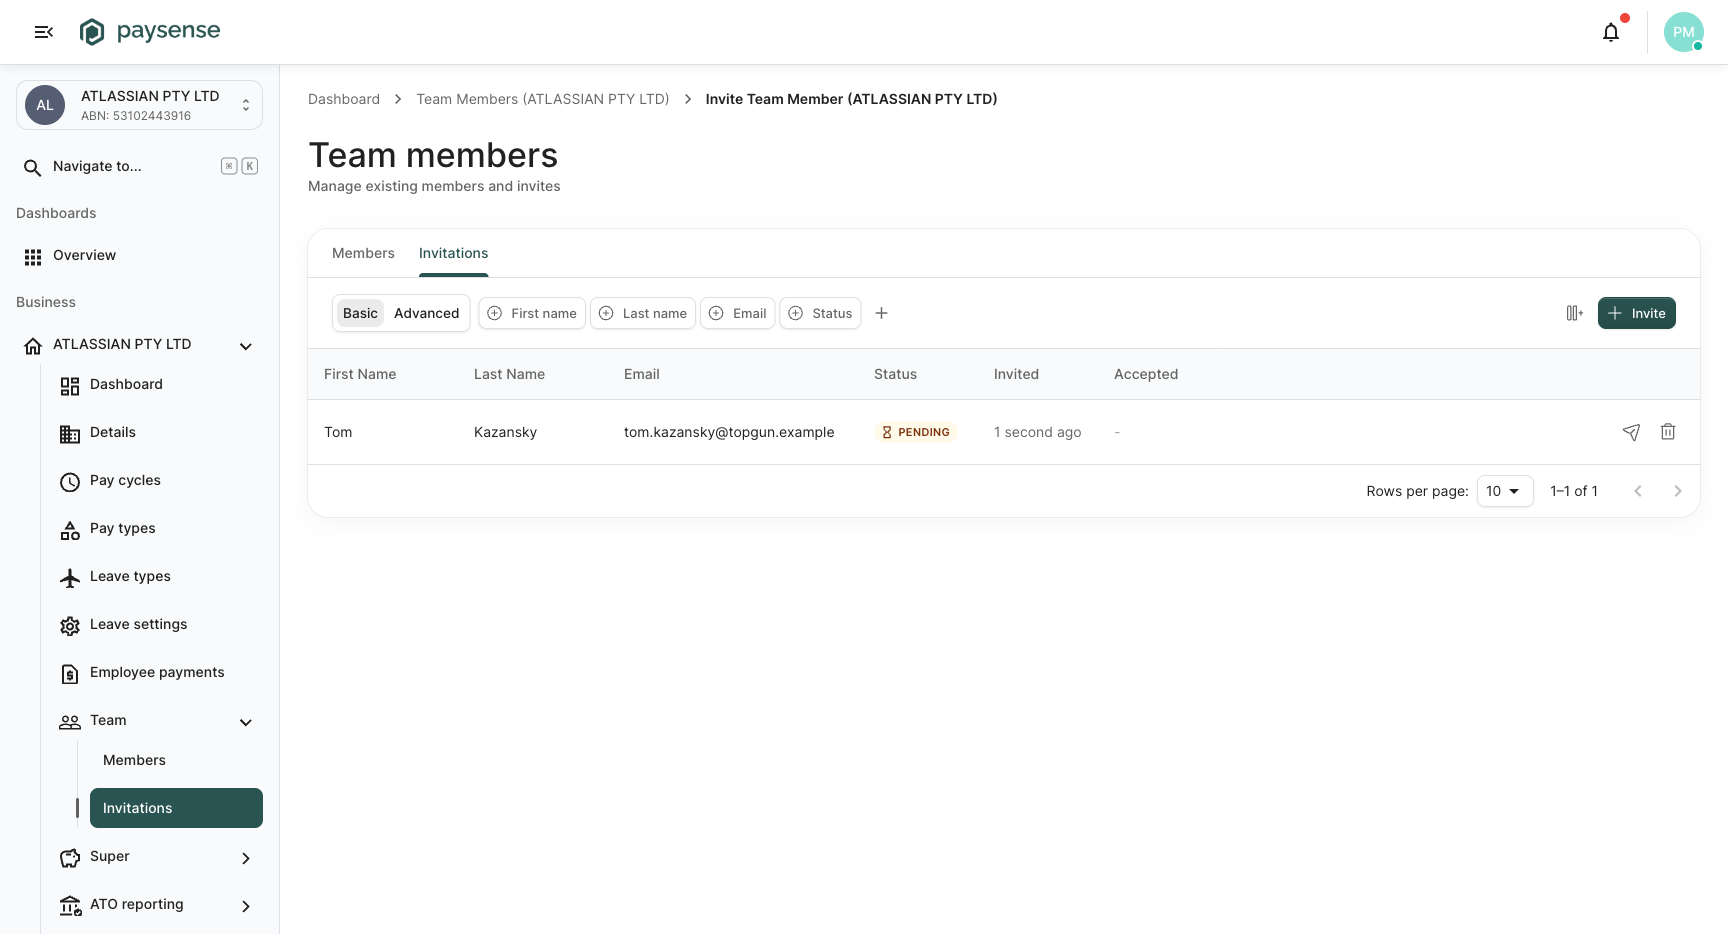
Step 5: Manage pending invites
Each Pending row has a three-dot menu in the Actions column with two options:
| Action | When to use it | Notes |
|---|---|---|
| Resend Invite | The user said they didn't receive the email, or the original link expired | Generates a fresh invite link and re-sends the email. Confirmation dialog: "Resend invite to <email>?" |
| Delete Invite | You sent the wrong email or no longer want this person to have access | Permanently removes the pending invite. Requires the team:delete scope. Confirmation dialog: "Are you sure you want to delete this invite? This action cannot be undone." |
Once the user accepts, the row's status flips to Completed and the action menu disappears - completed invites can't be resent or deleted, since the user is now a full member. Head to Team > Members to manage them from there.
Status meanings
| Status | What it means | Next action |
|---|---|---|
| Pending | Invite sent, waiting on acceptance | Wait, or Resend Invite if email was lost |
| Completed | Accepted - user is now a member | Manage them via Team > Members |
| Failed | The email failed to deliver (bounce, spam-block, mailbox full) | Verify the address with the user and Delete + re-invite |
| Expired | The link timed out before the user clicked it | Resend Invite to generate a fresh link |
Invite links are single-use and time-limited. If a colleague clicks an old link after accepting on a new one, they'll see an "already used" error - safe to ignore.
What's next
After the colleague accepts, you'll likely want to:
- Fine-tune their permissions - the preset you picked at invite time is a starting point. As you see how they actually work, head to Manage permissions and adjust their scopes.
- Invite more colleagues - repeat this flow for each person. There's no bulk-invite, but the dialog is fast enough to chain invites one after another.
- Audit the invite history - the Invitations tab keeps Completed and Failed rows alongside Pending ones, so you can see who joined when, and whose invites never made it.
Troubleshooting
| Symptom | Likely cause | What to do |
|---|---|---|
| Send Invite stays disabled after filling all fields | Email validation is still in-flight, or returned a warning | Wait for the callout under the email field. Read it carefully - it explains why the invite can't be sent. |
| Callout says "already a member" | The user is on Team > Members already | Manage their permissions from there instead of inviting again |
| Callout says "active pending invite" | A pending invite exists for this address | Find it in the table and use Resend Invite rather than creating a duplicate |
| Toast says "Failed to send invite" | Server-side error - email service unavailable, invalid SMTP config, or transient outage | Wait a minute and click Send Invite again. If it keeps failing, check the Audit Logs report for the underlying error message. |
| Colleague says they didn't get the email | Spam folder, bounce, or wrong address typed | Confirm the address with them, then Resend Invite on the pending row. If still no luck, Delete the invite and create a new one with the corrected address. |
| Invite button is missing from the toolbar | You don't have team:write | Ask the owner or another administrator to grant Team (Edit) to your user via Manage permissions |
| Delete Invite option doesn't appear on the actions menu | You don't have team:delete | Ask the owner or another administrator to grant Team (Delete) to your user |
If the table doesn't cover your problem, the Audit Logs screen (under Reports) records every invite-create, invite-resend, and invite-delete event with the actor, timestamp, and the affected email - useful when investigating who invited a particular person.