Set up employment contracts
An employment contract in Paysense is a set of progression rules that move an employee onto a new pay level automatically as they reach each service milestone - for example, lifting a carpenter from one award level to the next after two years. Each contract carries a ladder of pay rules, and each rule names a pay type definition, a level on that definition, and the pay type whose rate applies for a band of service time. You build a contract once and it drives every employee it is attached to, so you don't re-key the same award progression per person.
This tutorial builds a two-rule contract end-to-end on the MA000020 - Building and Construction Award business, which already carries the pay type definitions and levels the rules point at. By the end you'll have a saved Carpenter progression (CW/ECW) contract with a first-two-years rule and an open-ended rule for everything after.
What you'll need
| Item | Required | Notes |
|---|---|---|
| A business in Paysense | Yes | Created via the Add a business tutorial |
The employmentcontract:read scope | Yes | Gates both the screen and its sidebar item. Without it the page redirects to No Access. |
The employmentcontract:write scope | Yes | Gates Add Contract, Create, and Save |
| At least one pay type definition with levels and rates | Yes | Every pay rule names a definition, a level on it, and a pay type carrying a rate on that level. Set these up under Pay Types first. |
You don't have to build the whole ladder in one sitting. Create the contract with its details and one rule, click Create, and Paysense drops you on the edit screen where you can add the rest of the rules whenever you're ready.
Step 1: Open the Employment Contracts screen
From the left-hand sidebar of your business, click Employment contracts. You'll land on the list at /business/{businessId}/employmentcontractdefinitions. On a business with no contracts yet, the screen shows an empty state and a Create your first contract button.
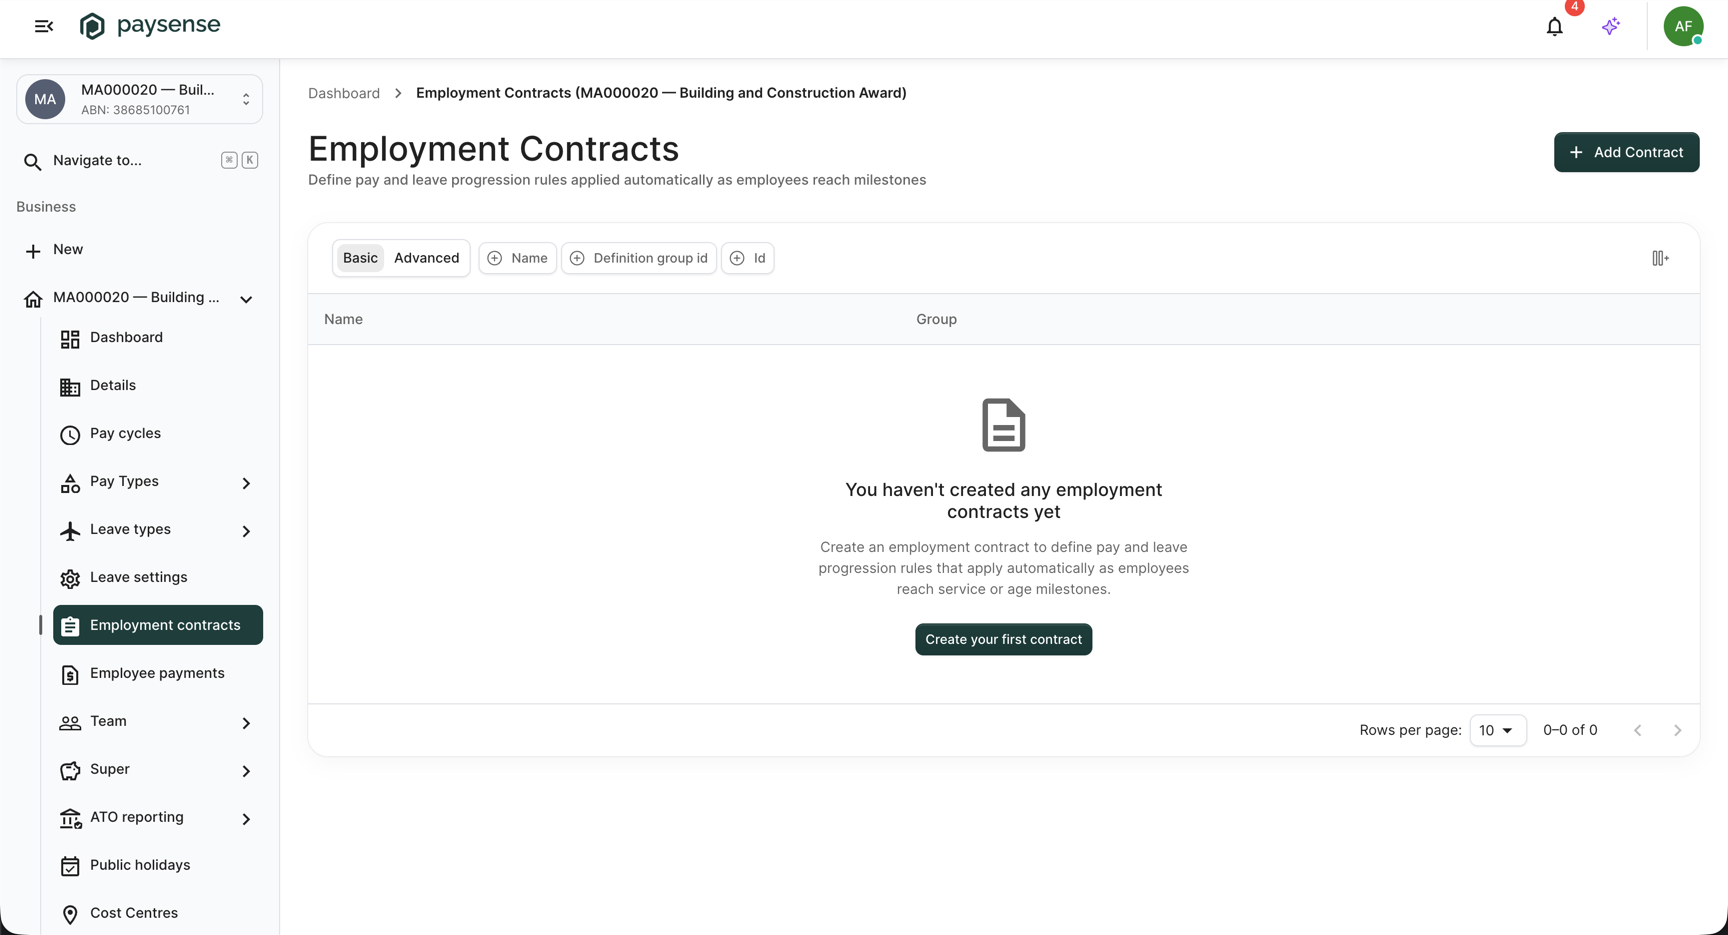
Click Add Contract in the top-right (or Create your first contract in the centre) to open the new-contract screen at /business/{businessId}/employmentcontractdefinitions/new.
The Add Contract button colour, the logo, and the highlighted sidebar item come from your partner's tenant branding and differ per portal. Look for the button labelled Add Contract, not for a particular colour.
Step 2: Name the contract
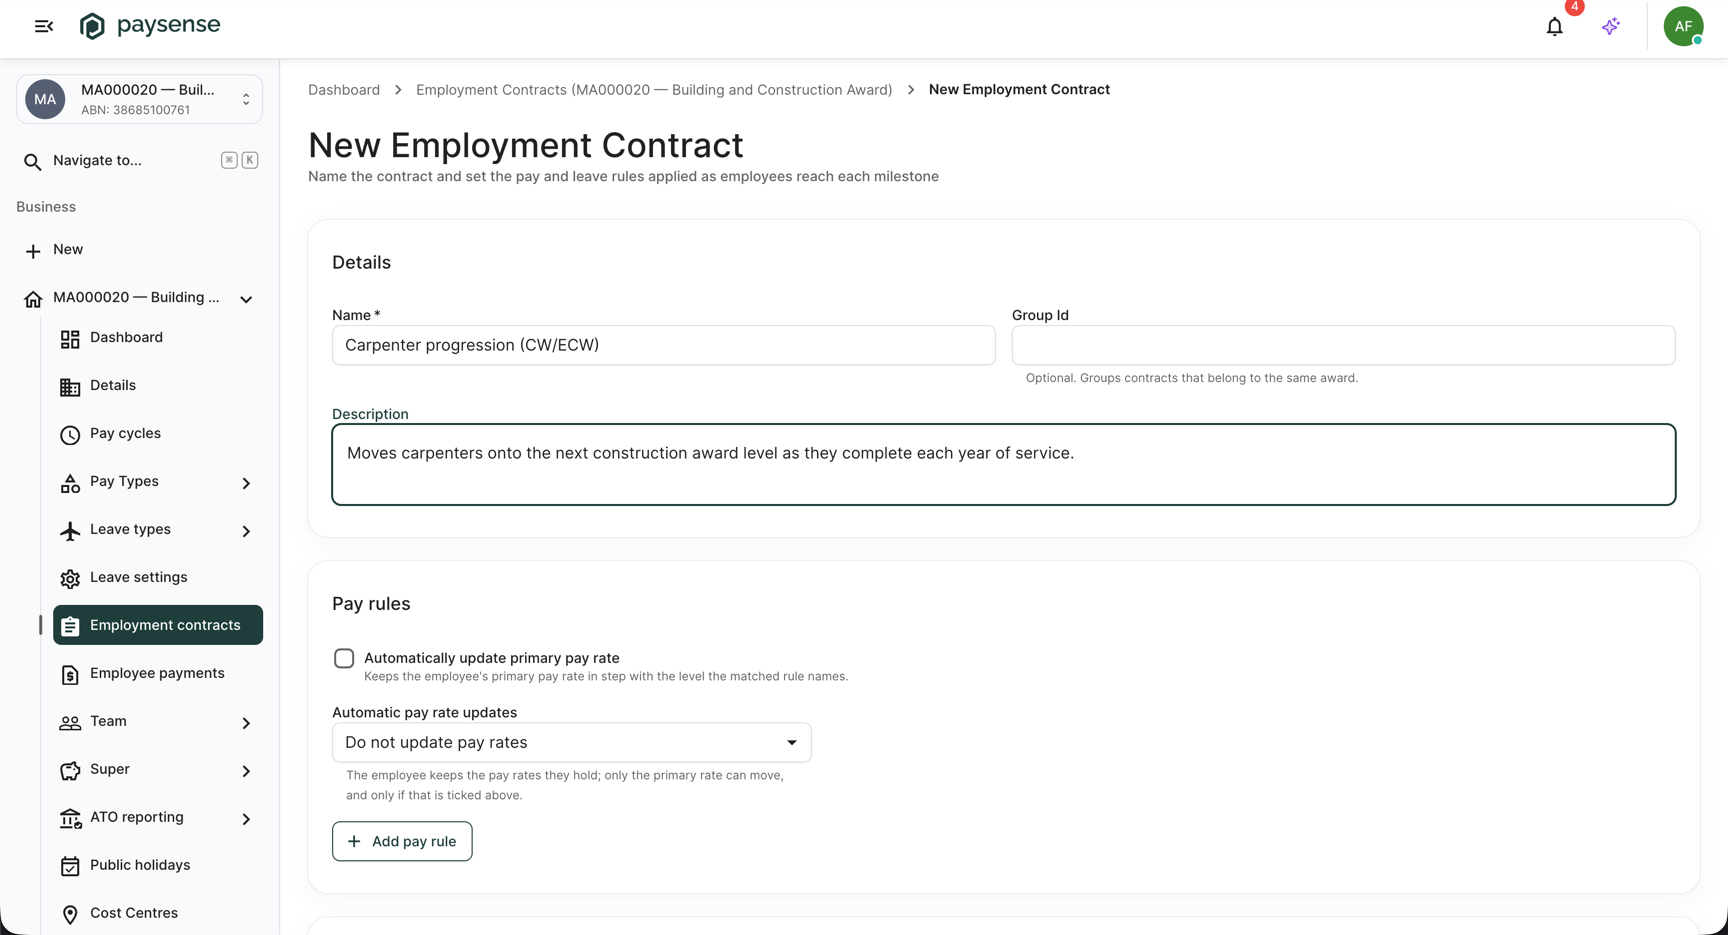
The new-contract screen opens on the Details card. This is the contract's own identity, separate from its rules.
| Field | Required | Notes |
|---|---|---|
| Name | Yes | Up to 100 characters. Must be unique within the business - a duplicate is rejected with Employment contract definition with name '<name>' already exists. |
| Group Id | No | Optional number. Groups contracts that belong to the same award so you can filter the list by it. |
| Description | No | Up to 500 characters. Free text describing what the contract does. |
For this walkthrough, enter the name Carpenter progression (CW/ECW) and a short description. Leave Group Id blank.
Step 3: Add the first pay rule
Scroll to the Pay rules card and click Add pay rule. A rule card appears with three cascading dropdowns - the pay type definition drives the level list, and the level drives the pay type list - plus the service band the rule covers.
| Field | Required | Notes |
|---|---|---|
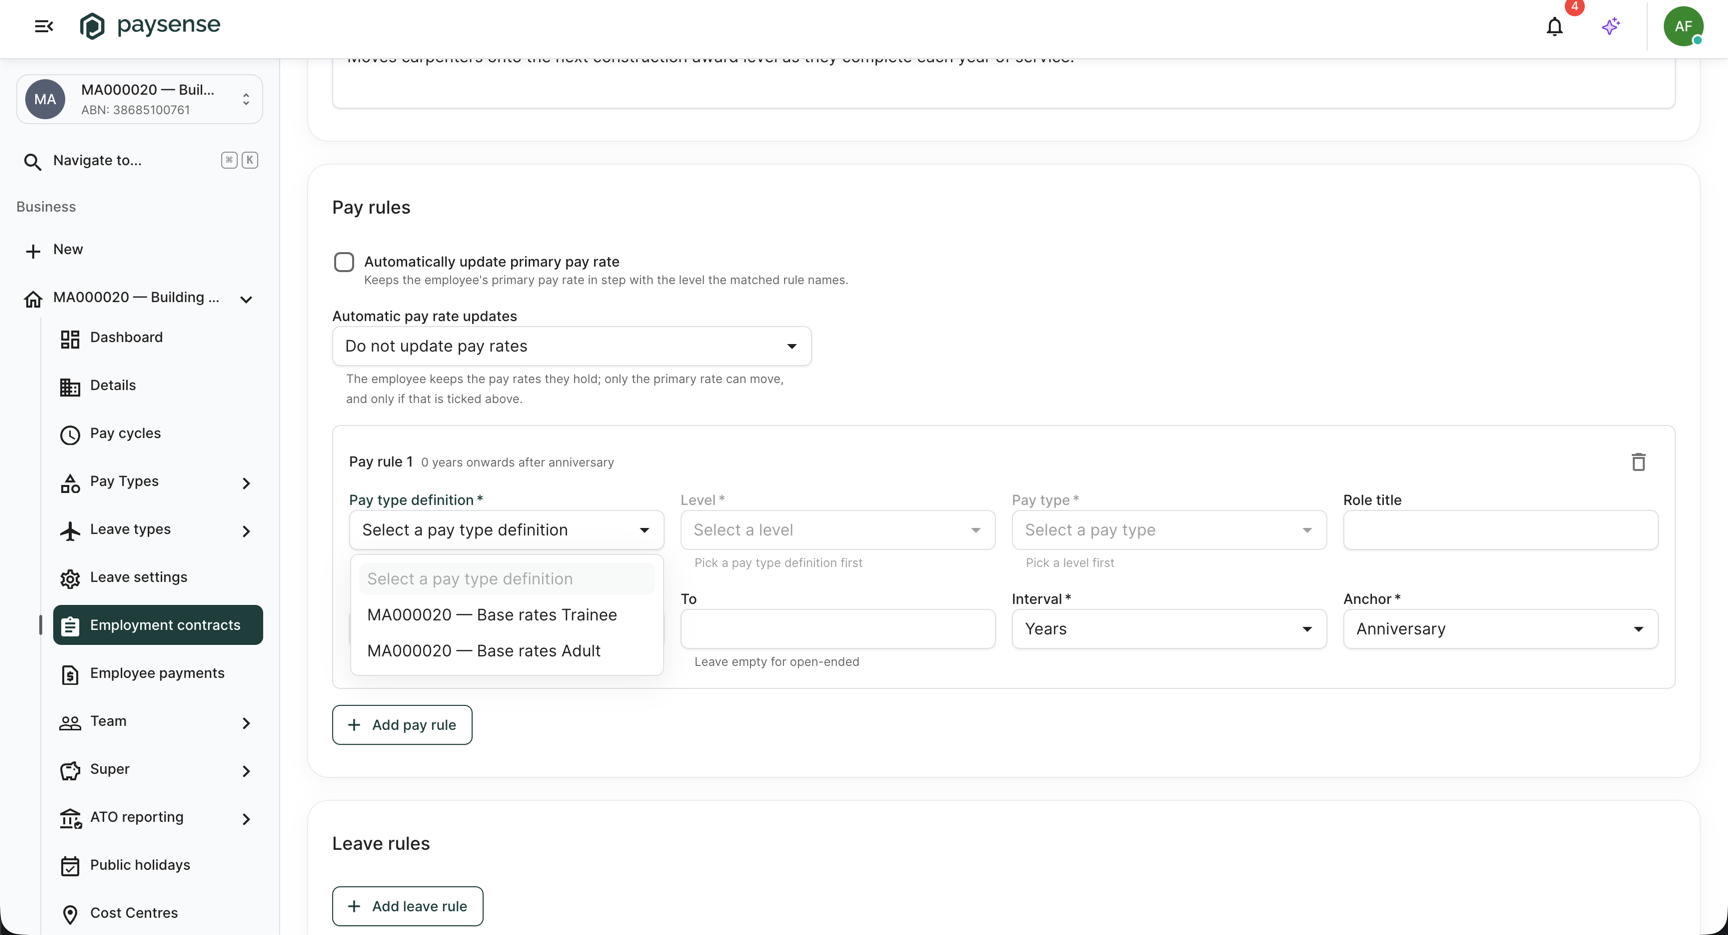
| Pay type definition | Yes | The award pay structure the rule reads from. Selecting one loads its levels. |
| Level | Yes | A level on the chosen definition. Disabled until a definition is picked; must belong to that definition. |
| Pay type | Yes | A pay type carrying a rate on the chosen level. Disabled until a level is picked. |
| Role title | No | Free text shown in the rule summary. Falls back to the pay type name when blank. |
| From | Yes | Service time the band starts at, zero or more. The first rule must start at 0. |
| To | No | Service time the band ends at. Leave blank for an open-ended rule. Must be greater than From. |
| Interval | Yes | Years, Months, or Days - the unit From and To are counted in. Every rule in the ladder must use the same interval as the first. |
| Anchor | Yes | Anniversary, Date of birth, or Reference date - what the service time is measured from. Every rule must use the same anchor as the first. |
Open the Pay type definition dropdown to see the definitions on this business.
Select MA000020 - Base rates Adult, then pick Level 1 (CW/ECW 1) and the Ordinary hours pay type. Enter Carpenter as the role title, leave From at 0, set To to 2, and leave Interval on Years and Anchor on Anniversary. The summary beside the rule title updates to show the matched rate and the band it covers.
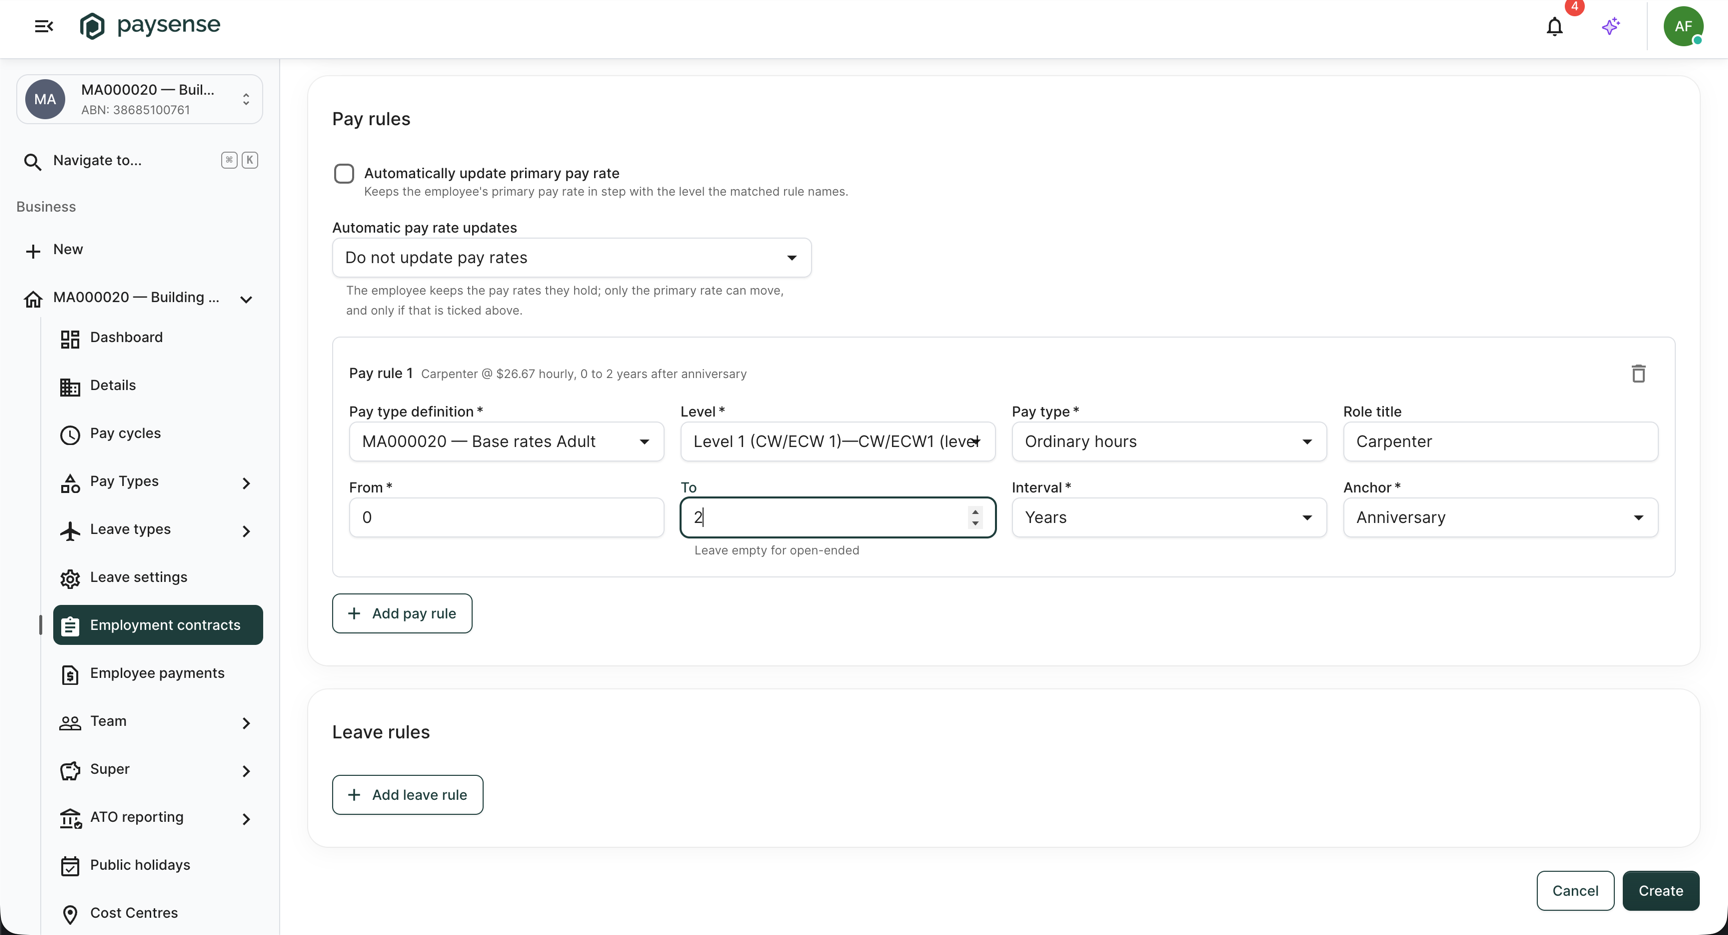
The rate shown in the rule summary is read from the level's row for the pay type you picked. A pay type with no rate on that level has nothing to apply, so only pay types carrying a rate appear in the dropdown.
Step 4: Extend the ladder with a second pay rule
A contract's rules must tile the whole service axis with no gaps and no overlaps, on one shared interval and anchor. Click Add pay rule again. Paysense seeds the new rule to start where the ladder currently stops - 2 years - closes off the previous rule at that point, and inherits its interval and anchor. Leave To blank so this rule is open-ended and covers everything from two years on.
Select the same MA000020 - Base rates Adult definition, pick Level 2 (CW/ECW 2) and Ordinary hours, and enter a role title.
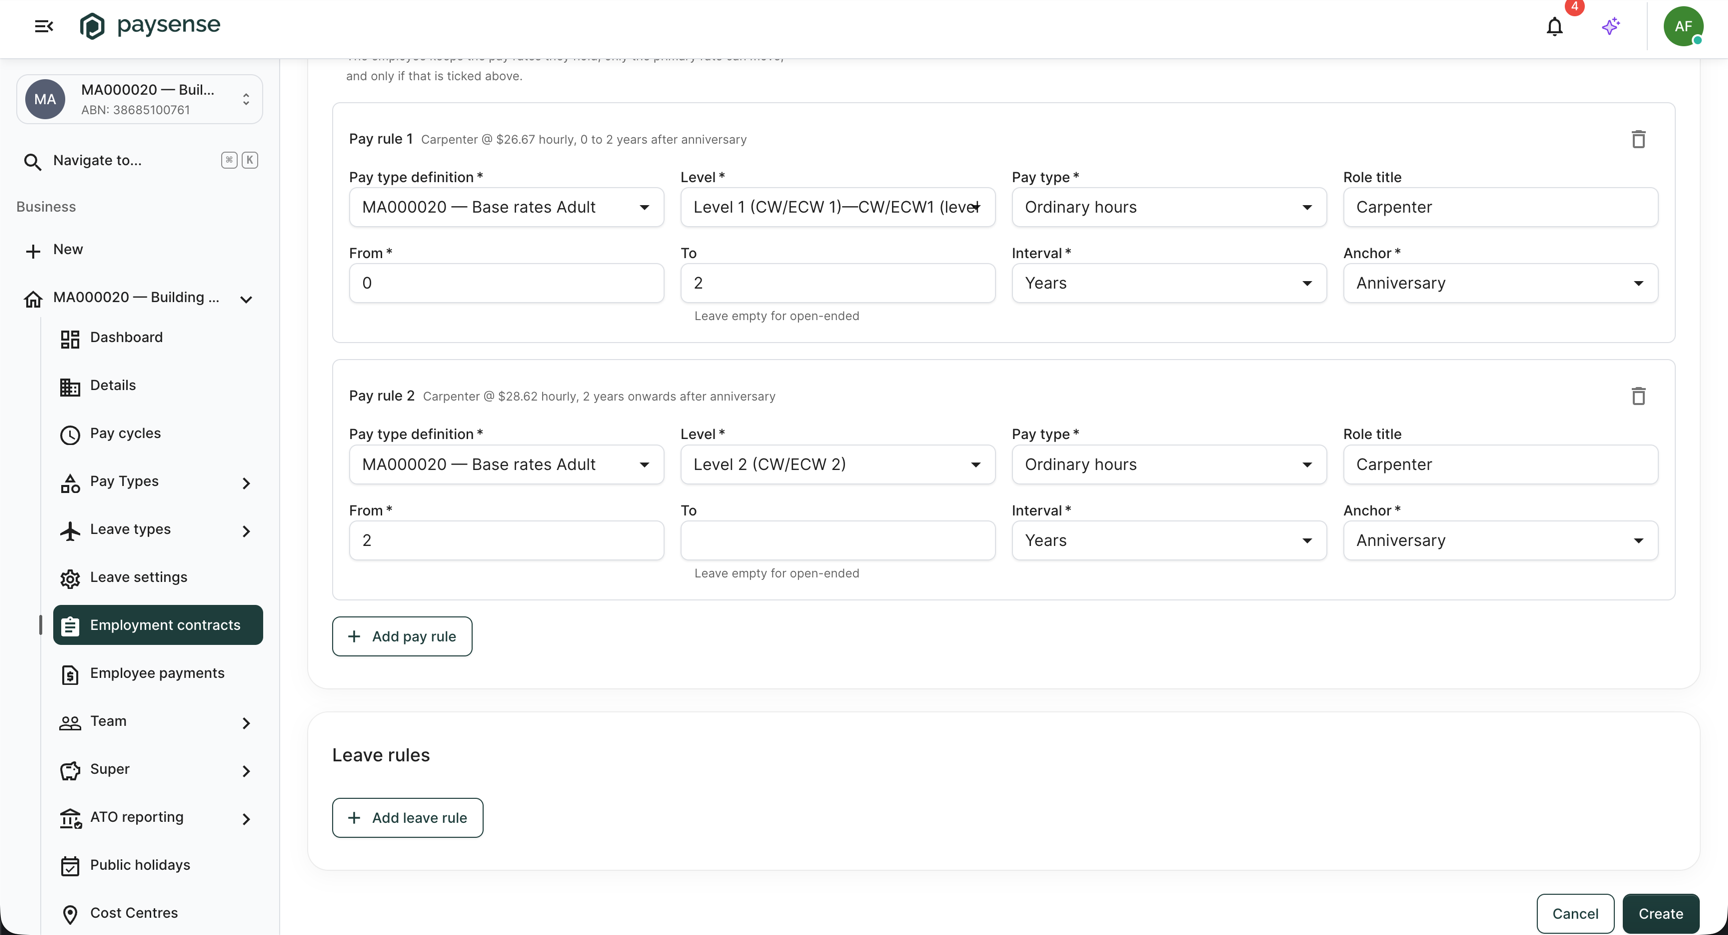
The ladder must start at 0, leave no gap between one rule's To and the next rule's From, and end on a single open-ended rule. If it doesn't, the save is rejected with a message such as the first rule must start at 0 or the last rule must be open-ended (leave To blank), pinned to the rule at fault.
Step 5: Set how far the contract rewrites pay rates
Two controls at the top of the Pay rules card decide how far a matched rule is allowed to write the employee's rates. They apply to the whole rule set, not to any one rule.
| Field | Required | Notes |
|---|---|---|
| Automatically update primary pay rate | No | Off by default. When on, the employee's primary pay rate moves in step with the level the matched rule names. |
| Automatic pay rate updates | No | Defaults to Do not update pay rates. The other options rewrite the employee's non-default pay types to the matched level's rates (Update pay rates), optionally reaching their default pay types too (Update pay rates, including defaults). |
Open the Automatic pay rate updates dropdown to see the three modes.
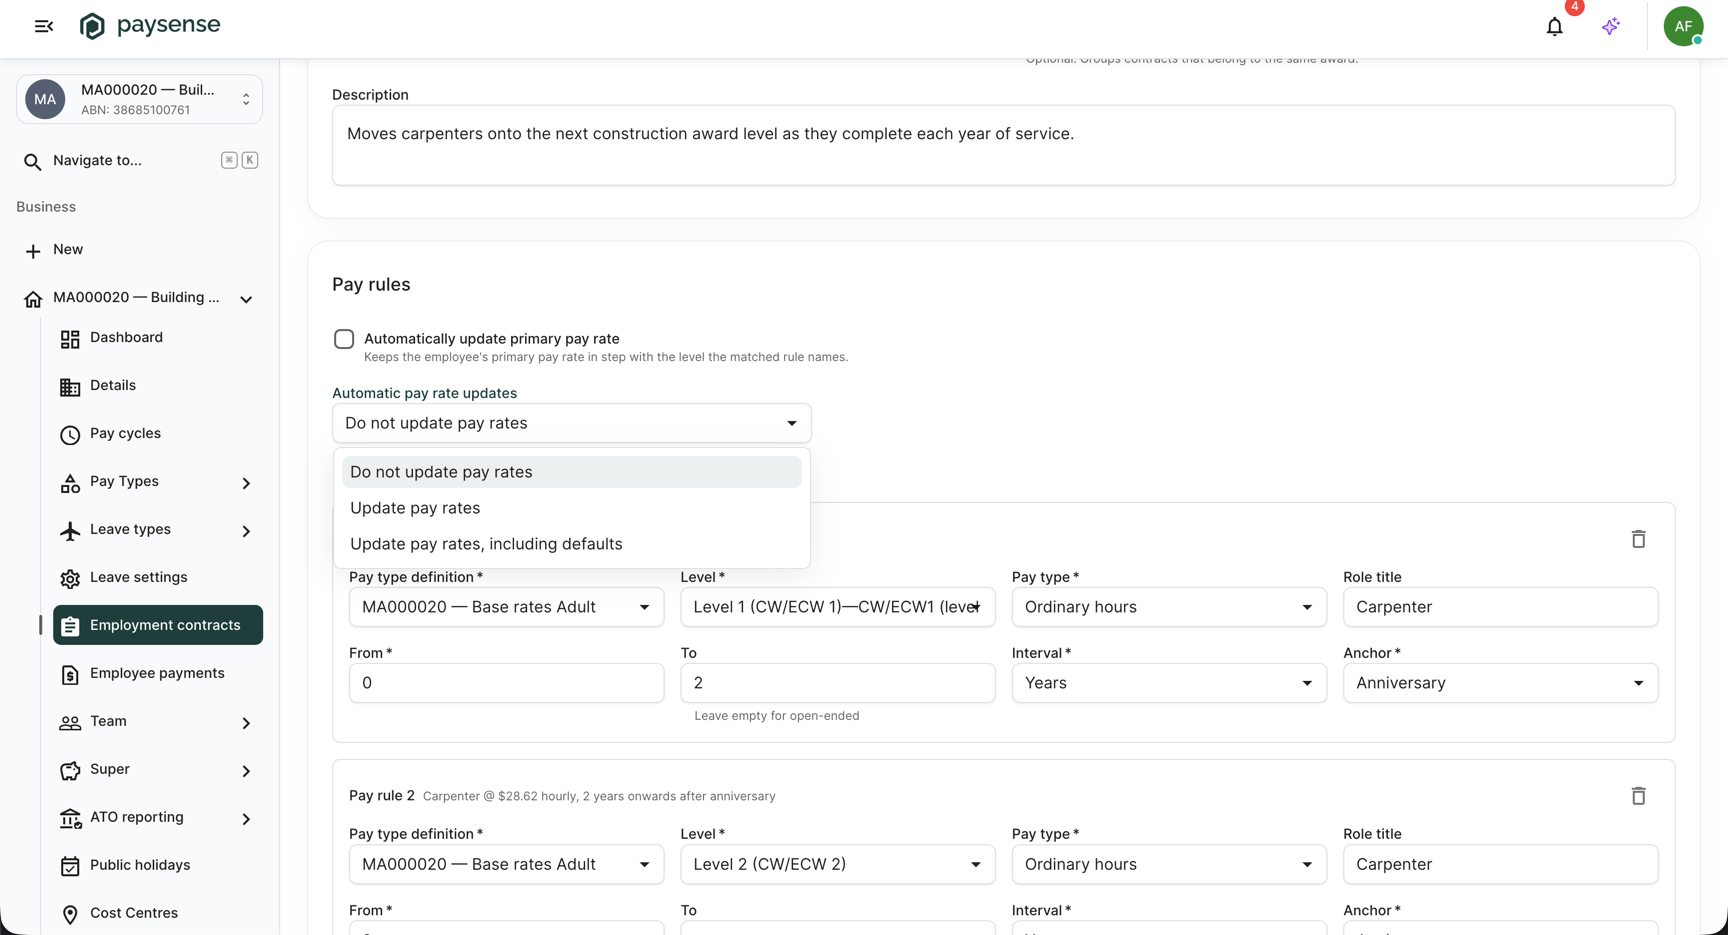
For this contract, tick Automatically update primary pay rate and choose Update pay rates. The helper text under the dropdown explains what each mode does as you select it.
Step 6: Create the contract
With the details, both rules, and the update mode set, click Create in the bottom-right. Paysense saves the contract, shows a Contract created toast, and navigates you to the edit screen at /business/{businessId}/employmentcontractdefinitions/{id}/edit.
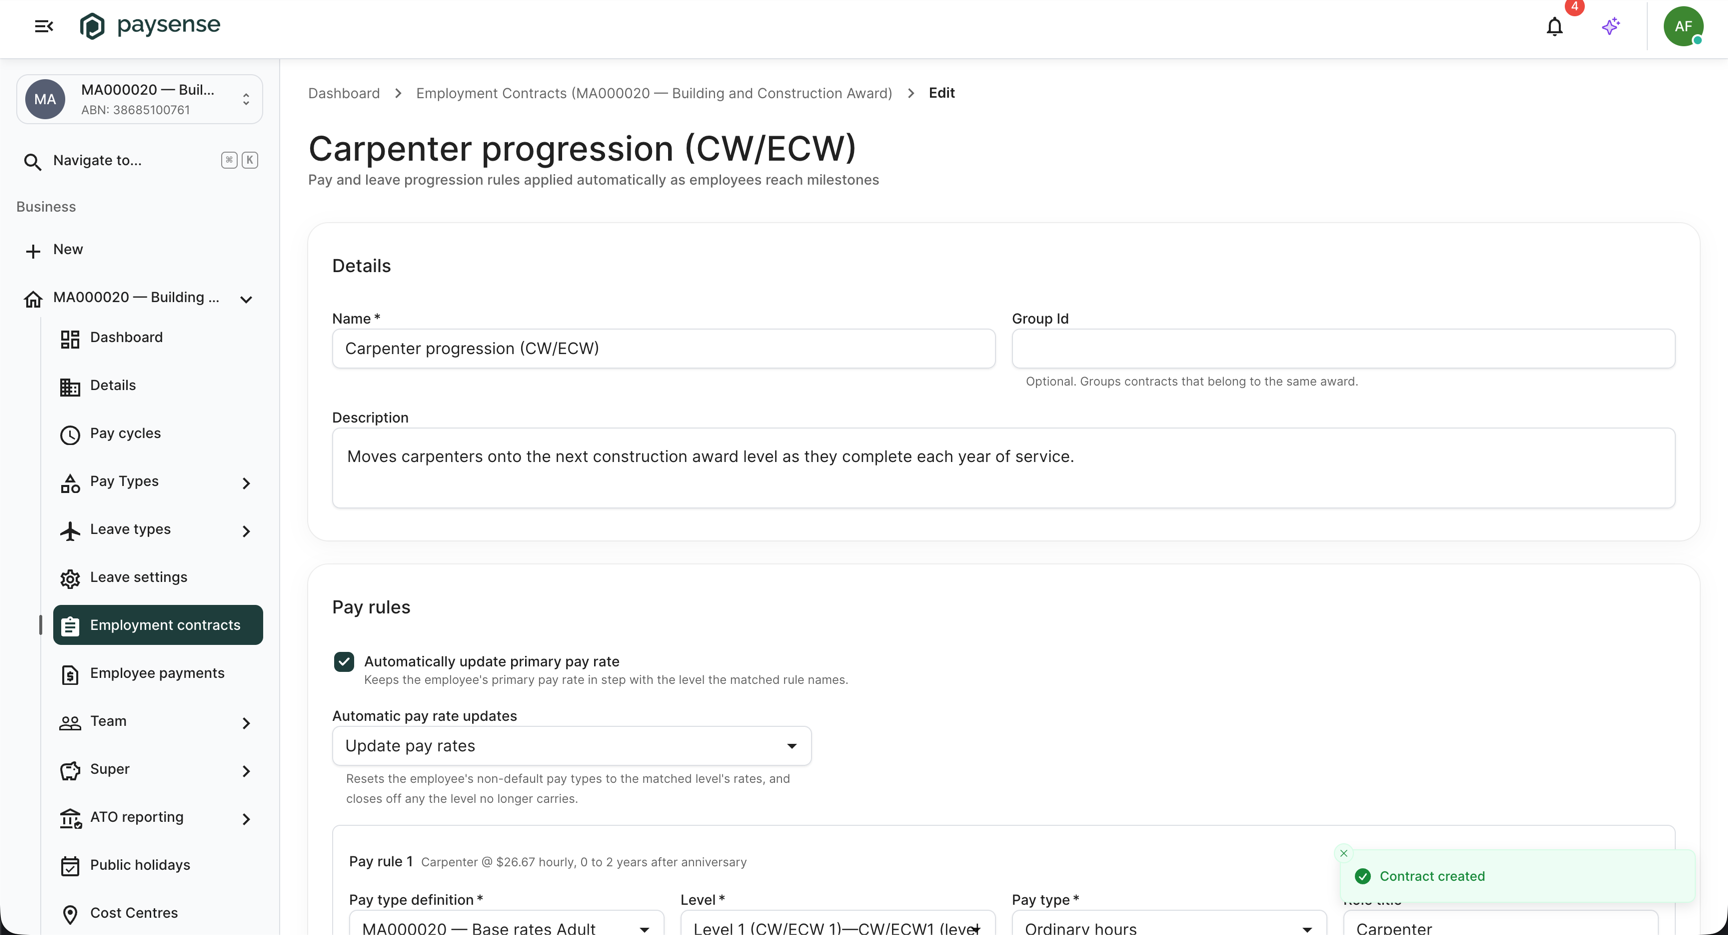
A rule set can also be built up here rather than on the create screen. Creating the contract with just its details and coming back to add rules on this edit screen is a valid path - the edit screen carries the same Pay rules card.
Step 7: Update an existing contract
The edit screen holds the same form as the create screen, seeded with the saved contract. Change any field - here, the second rule's Role title - and click Save. Paysense saves in place and shows a Contract saved toast; the edit screen stays open so you can keep working.
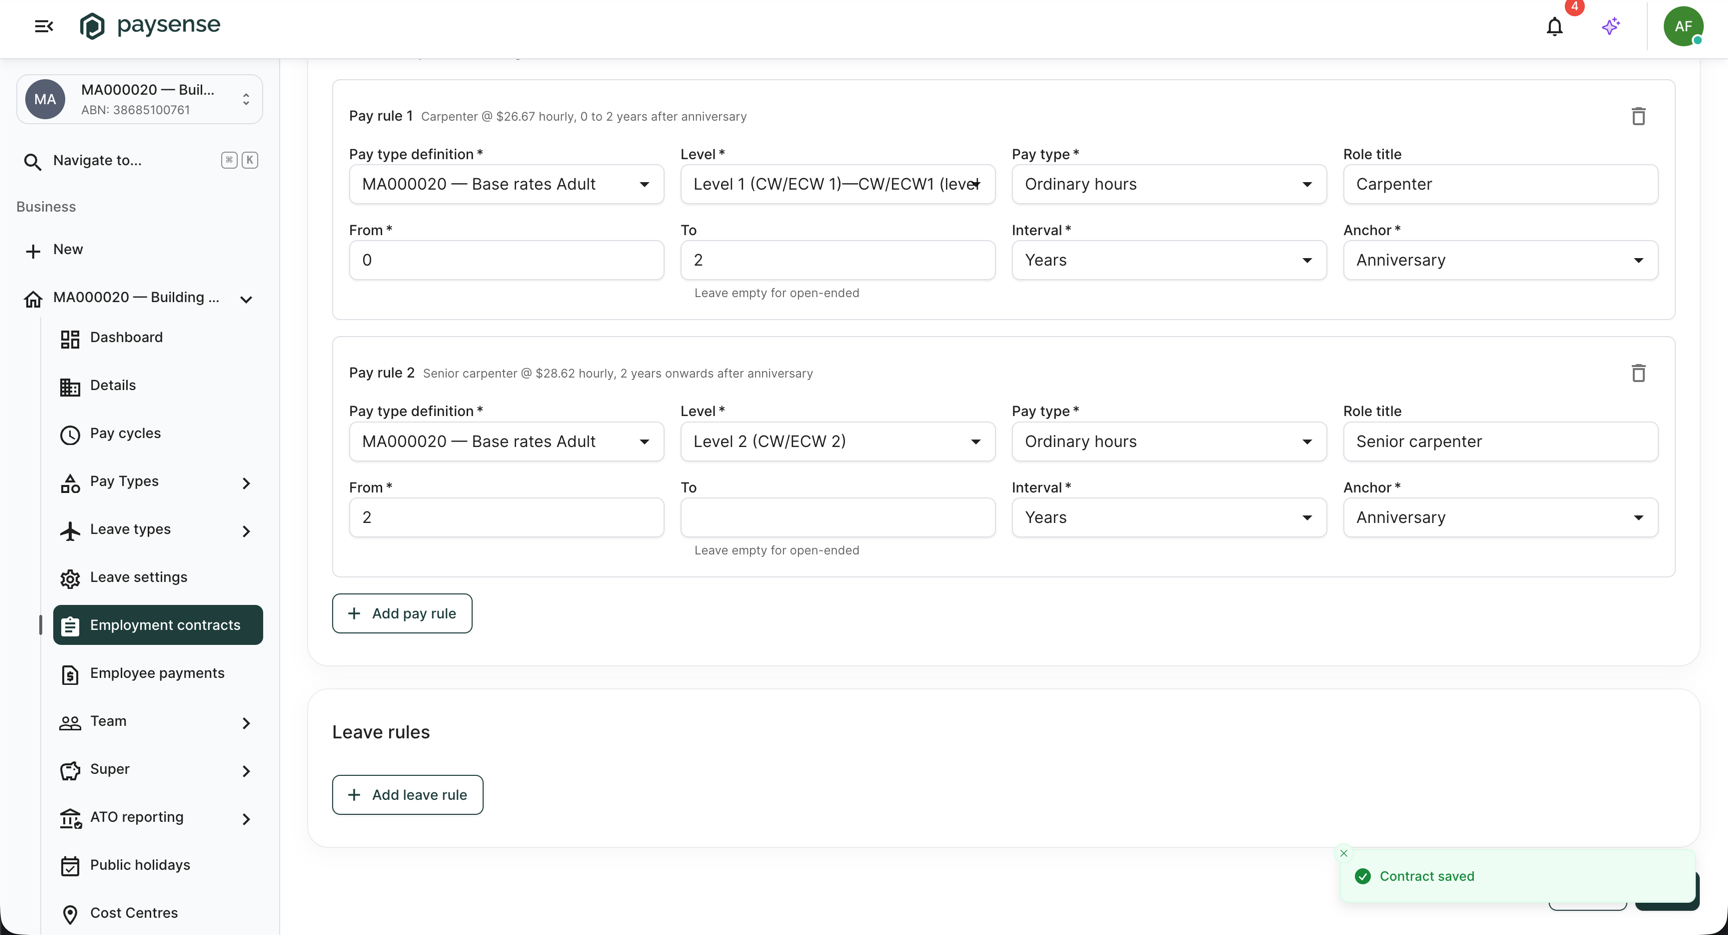
An employment contract also carries a Leave rules card with the same period fields as a pay rule, mapping service bands onto leave type definitions. It needs at least one leave type definition on the business to point at, and is left empty in this walkthrough.
Step 8: Confirmation
Return to the Employment Contracts list at /business/{businessId}/employmentcontractdefinitions. Your new contract appears as a row with its name and group, and Edit and Delete actions.
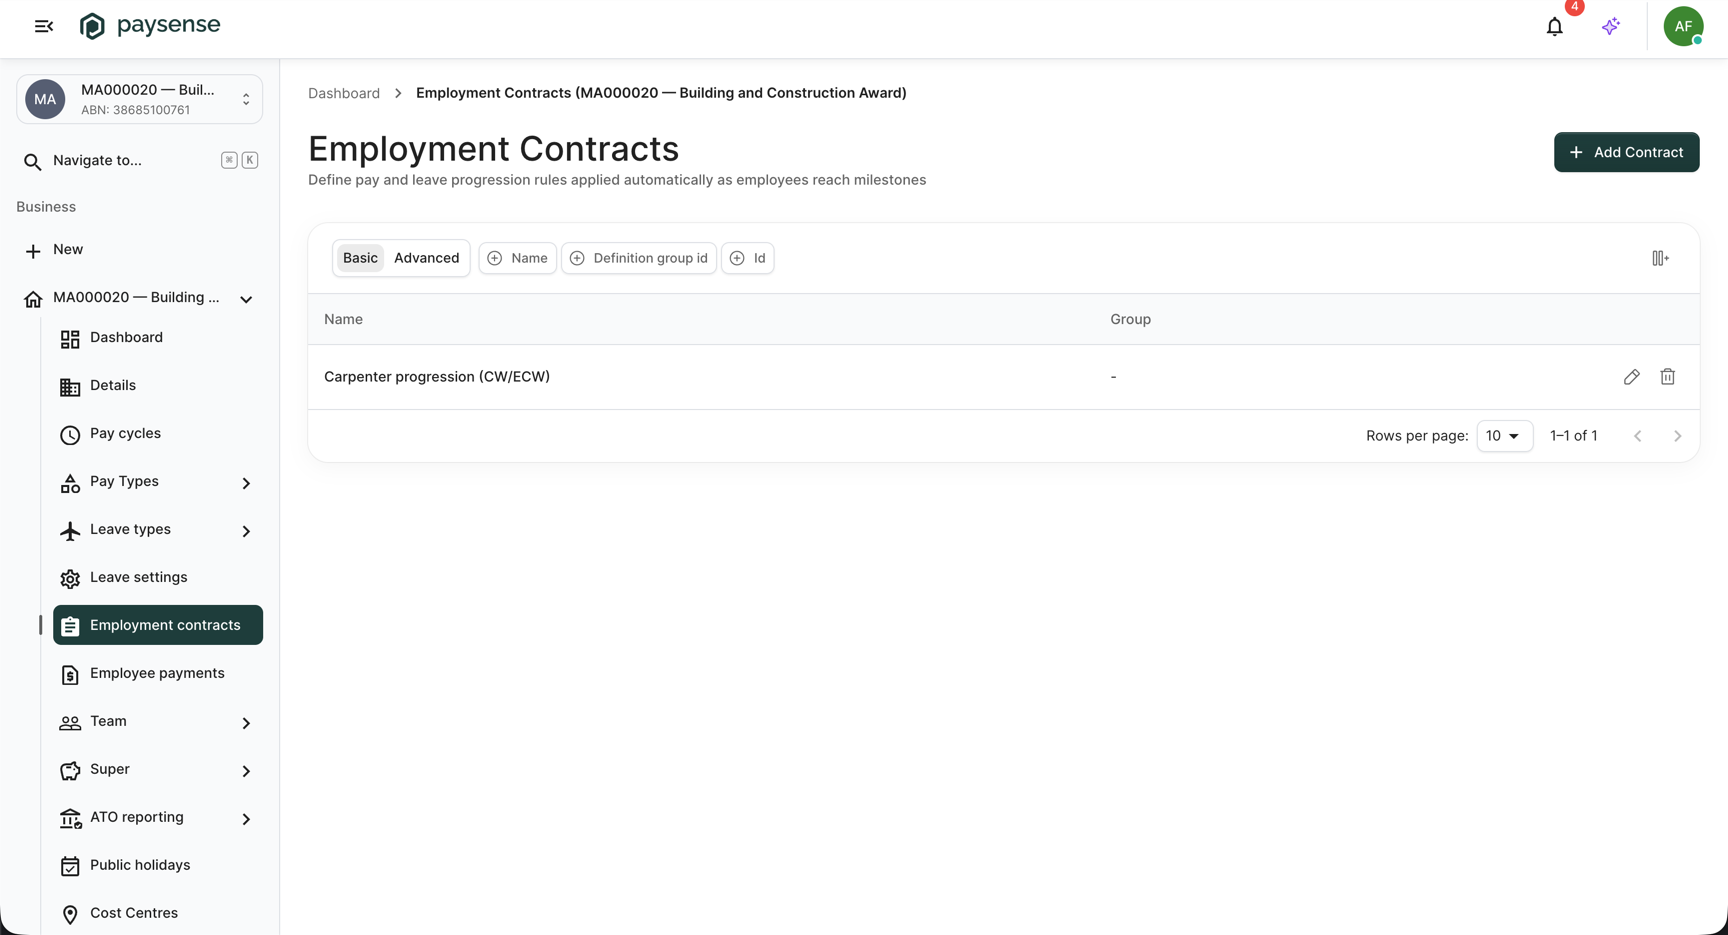
From here you can reopen the contract with the pencil icon, or remove it with the trash icon. Deleting asks you to confirm with Delete '<name>'? This cannot be undone. before it goes.
What's next
Now that a contract exists, the typical next steps are:
- Attach it to employees - a contract drives the employees it is linked to. See Add an employee.
- Line up the pay types it points at - each pay rule reads a rate from a level on a pay type definition, so keep those definitions current. Tutorial coming soon.
- Add leave progression - build a Leave rules ladder once the business has leave type definitions to point at. Tutorial coming soon.
Troubleshooting
| Symptom | Likely cause | What to do |
|---|---|---|
| Create or Save does nothing | A pay rule is missing a selection | Look for Select a pay type definition, Select a level, or Select a pay type under the rule's dropdowns and fill them in |
the first rule must start at 0 | The lowest rule's From is not 0 | Set the first rule's From to 0 |
| A rule shows an overlap or "not covered by any rule" message | Two rules' bands overlap, or a gap sits between them | Line up each rule's To with the next rule's From so the bands touch |
the last rule must be open-ended (leave To blank) | The final rule has a To value | Clear To on the rule that covers the longest service |
Employment contract definition with name '<name>' already exists. | Another contract on this business already uses the name | Give the contract a different name |
| Screen is blank or redirects to Not Found | The employment contracts feature flag is off for this tenant | Ask your Paysense administrator to enable it |
| Redirects to No Access | Your user lacks the employmentcontract:read or employmentcontract:write scope | Ask a team member with Manage team to grant it |
If you hit a problem the table doesn't cover, check the Notifications panel on the business dashboard - Paysense logs every employment-contract action there.